Virtualbox machine transfer. Transferring old Windows OS to a virtual machine. Universal virtual machine export file format
A problem was identified - the designer was bought new computer and it was necessary to transfer all his programs from the old one (XP) to the new one. A particular difficulty was caused by the transfer of programs from “Estimate Wizard” with all the settings, databases and a bunch of other incomprehensible things. Technical support I asked for a substantial amount for the transfer, and they honestly said that even they wouldn’t be able to do it “on the fly.” Then a bunch of other such specific programs “surfaced” (some even for DOS) that I really became sad...
The process of torment itself...
I started digging into virtualization and decided to get help Virtual PC 2007, which has helped me out more than once in similar situations. I will not describe the entire transfer process, an ambush was waiting where no one expected it, Virtual PC 2007, in principle, does not work with USB ports host machine, i.e. USB electronic key for software did not work, which lost the whole point of the transfer. Virtualbox and Vmware technologies did not suit me in principle; I wanted something simpler and more efficient.
Hello friends! Today, Vladimir has prepared some amazing material for fans of virtual machines!
Hello admin, please tell me how to transfer virtual VirtualBox machine on a regular computer?
A few months ago Windows 10 came out and I was afraid to install it directly on my computer, but installed it on a virtual machine, then installed all the programs I needed into the operating system: browsers, free OpenOffice, Skype and so on, after a while I began to notice that the tenth I liked Windows and even had the idea of transferring it to a regular computer! Is this possible? I couldn't find such information on the Internet.
How to transfer a VirtualBox virtual machine to a regular computer. Or how to transfer Windows 10 from a virtual machine to a desktop PC using the Vhd2disk program
Hello friends! It is possible to transfer the VirtualBox virtual machine to a regular computer, and often such a need arises system administrators, developers of various software and other computer specialists, the average PC user may also need this.
- Note: There is a website created specifically for virtual machine lovers.
To transfer, you can use a still little-known program Vhd2disk- designed specifically for transferring virtual operating systems to physical hardware, or in other words - to create an exact copy of a virtual VHD disk on a regular hard drive.
So, we have a VirtualBox virtual machine with Windows 10 installed on it.
Disk management
Disk 0, this is it virtual disk with installed Windows 10.
When creating the virtual disk, I specified the size as 250 GB. The operating system is installed on the drive (C:), and various files are located on the drive (E:).

First of all, we convert the virtual disk of the VDI format belonging to the virtual machine into the VHD format.

File -->Virtual Media Manager.
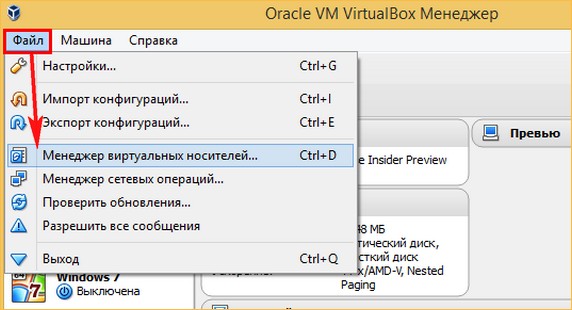
Select with the left mouse the VDI virtual disk that belongs to the operating system that we want to transfer to a regular computer and click on the button Copy.


Mark the item VHD (Virtual Hard Disk).
Next.

Mark the item Dynamic virtual hard drive .
Next.

Left-click on the explorer button.

Select a location to save the future copy of the virtual hard drive, I will select disk ( G:), since there is a lot of free space.

Copy.

There is a short process of converting the VDI virtual hard disk to the VHD format.

At the end of the process, click on the button Close.

On disk (G:) next to virtual hard drive VDI there is a copy of it, only in VHD format.

Disk management
You need to deploy a copy of the virtual disk onto a completely blank physical hard disk without partitions.
Open the Disk Management snap-in.
I will choose Disc 1.
I delete all partitions on it.


Vhd2disk
It's time for the Vhd2disk program.
Let's launch the program.

In the main Vhd2disk window, left-click on the Explorer button.

In the explorer that opens, find a copy of our VHD virtual disk, select it with the left mouse button and click Open VHD.

In the field Target drive we must indicate the serial number of the hard drive to which we will deploy a copy of the virtual disk. Click on the arrow.

Select from the drop-down list PhysicalDrive1, since we will expand the contents of the VHD virtual disk on Disc 1.

Click on the button Vhd to disk.


The process of copying the contents of the VHD virtual hard disk to a regular hard disk begins.
The process has completed successfully.
Status: VHD dumped on drive successfully!(VHD successfully copied to hard drive!).

Go to Disk Management, click Action-->Update.
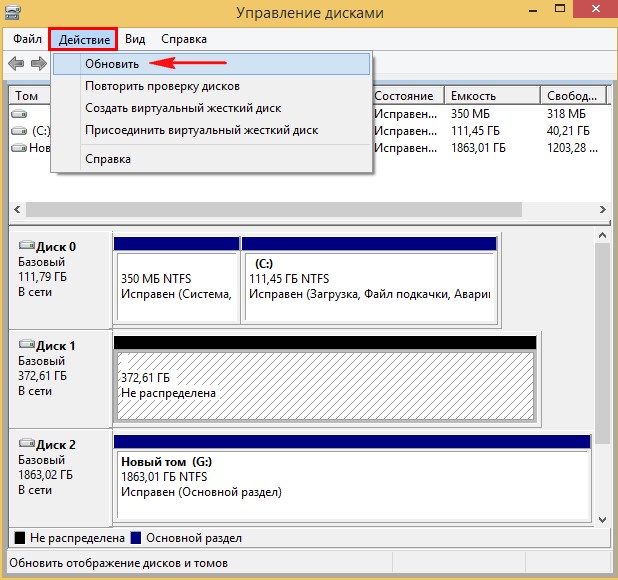
As you can see, the hard drive (Disk 1) is exact copy VHD virtual hard disk with virtual machine And installed Windows 10.

Trying to boot into Windows 10.
We restart the computer and enter the boot menu, select our hard drive (a copy of the VHD virtual disk with Windows 10).

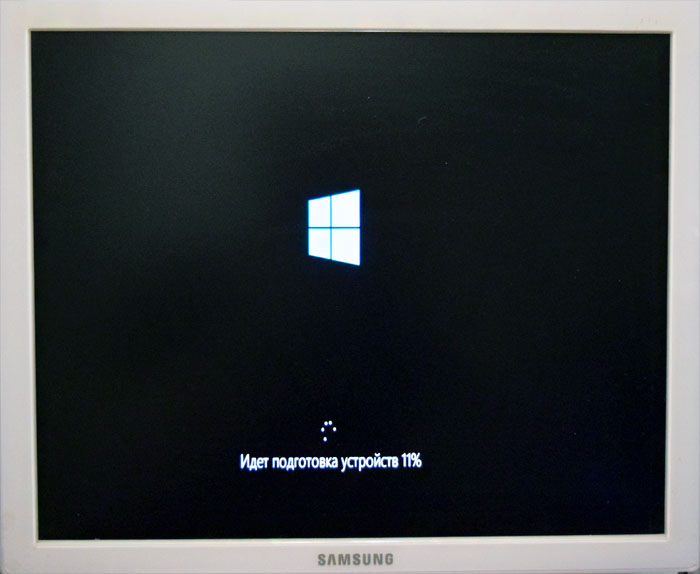
Preparing devices
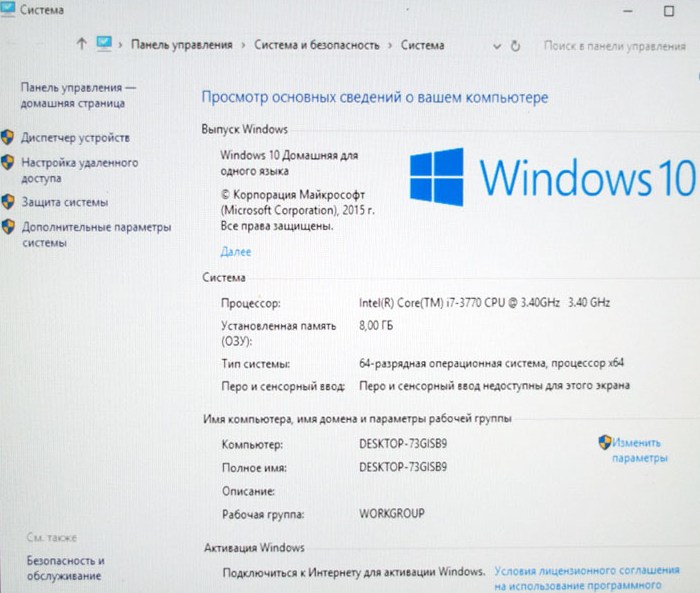
Windows 10 is loaded!

Disk management.

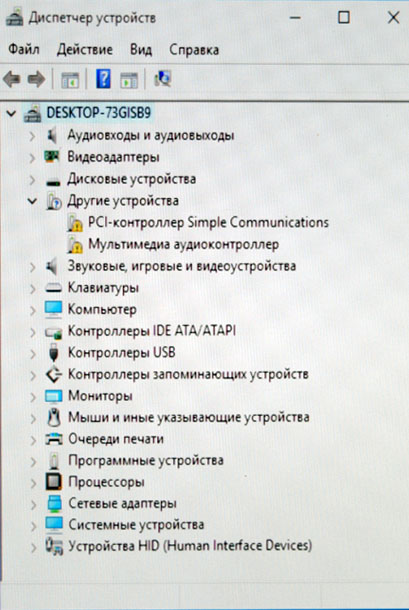
There are several devices in the task manager without drivers, but this is not a problem for us; we install the drivers using .
Hello dears! Question. Eat old computer with Windows XP installed and the programs I need, the machine is old and turns on every once in a while, the hard drive of the ancient IDE interface creaks terribly. I read your interesting articles about transferring operating systems to a virtual machine and I had a question: is it possible to somehow transfer Windows XP to VirtualBox installed on new laptop with Windows 10? Unfortunately, nothing worked for me, when I start the virtual machine there is a black screen and that’s it!I will be grateful for your answer.
Hi all! In today's article we will transfer Windows XP to a VirtualBox virtual machine installed on a new laptop with Windows 10.
Many readers may ask the question, under what circumstances might this be useful? Let me give you a simple example from the practice of your favorite admin!
One of his friends has a real sewing workshop for the production of clothes. There are several sewing machines in the workshop and all of these machines work only with computer program"Wilcom", which only works on Windows XP.
One fine day one computer breaks down, and accordingly one sewing machine stops working, the question arises about buying a new computer, and they buy it, but they buy a new laptop with Windows 10, because ordinary people They think that all computers are the same, but a laptop with Windows 10 is generally great. They turn on the laptop and connect the sewing machine to it, but for some reason it doesn’t sew!? What's up? They walk around the new laptop in circles, but the machine still won’t sew, even if you crack it.
They call our admin, he comes and explains to people that firstly, they need a disk with the Wilcom program , and secondly, the program will not work on Windows 10. And he suggests first of all finding a disk with the program installer, while he himself examines the laptop for Windows reinstallation 10 on Windows XP. The result in both cases is negative, the disk with the program was found, but it is in such a state as if it had been digested in someone’s stomach, and Win XP will never be installed on a purchased laptop, it is completely incompatible. The question arises, what to do?
The idea of exchanging a laptop for a simple system unit is not very successful, it’s a long drive, and we decided to hold off on it. Purchasing the program via the Internet also did not work; on the official website of the program there is only new version for $600 and it will only work with new sewing machines manufactured in 2012-2015; in the workshop there were machines with a manufacturing date of 2009.
The admin called me and after a short consensus we decided to do this, take one of the remaining Windows XP computers, create a copy of the drive (C:) in a VHD virtual disk file, then install the virtual machine on the Windows 10 laptop VirtualBox, then slip it the VHD file, if the outcome is favorable Win XP will start, the program will work and the machine will sew up?
So, we have it installed on desktop computer Windows XP with a set of programs.
https://technet.microsoft.com/ru-ru/sysinternals/ee656415
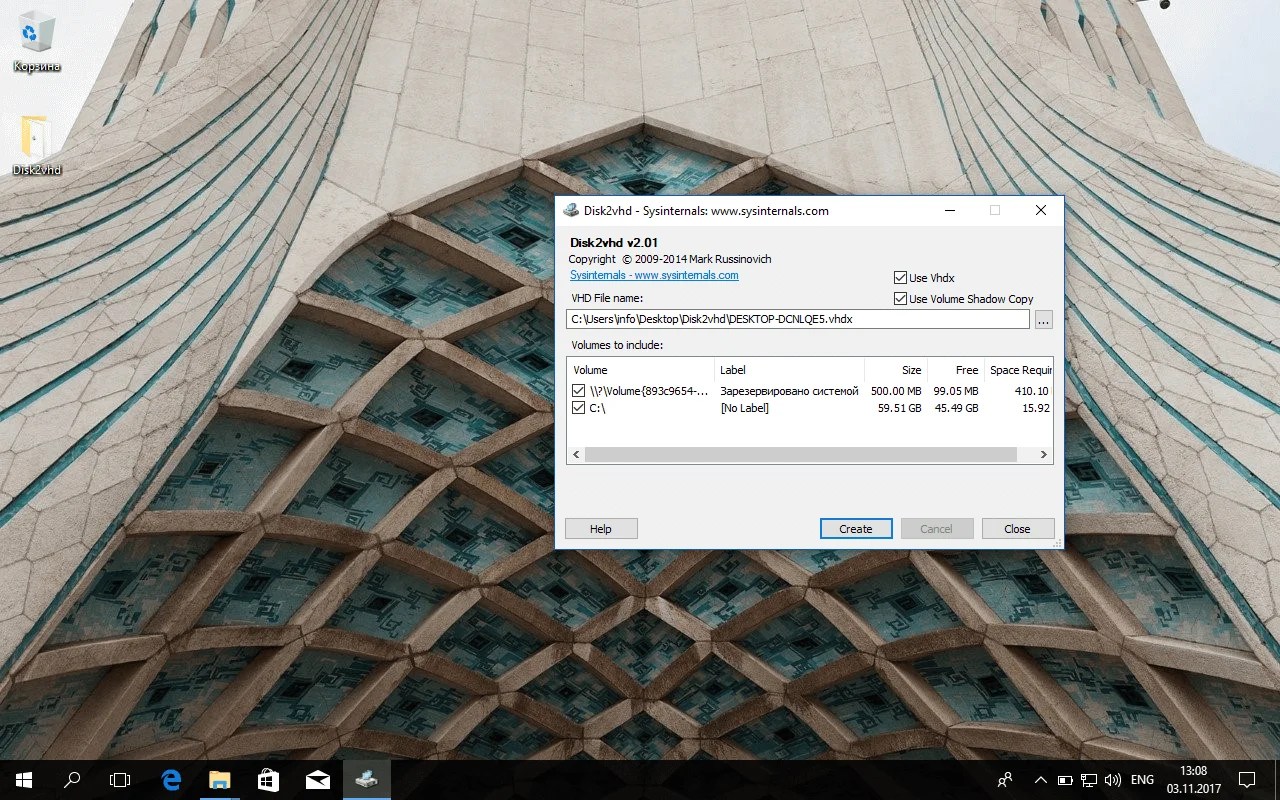
Launch Disk2vhd v2.01

Uncheck "Use Vhdx" if you want to create a regular virtual file hard drives VHD, not the new VHDX format.
We tick the hard drive partitions that are converted into a Vhd virtual disk file, I will mark the C:\ drive with Windows XP installed.
We name the future file “Windows XP”.
Click on the Explorer button on the right side of the window.

Let's save virtual file on a portable USB hard drive the drive letter (I:).


The virtual VHD disk creation process begins.

VHD virtual disk created on drive (I:) of a portable USB hard drive.
"Close"

VHD file with Win XP on disk (I:) of a portable USB hard drive.

We connect a portable USB hard drive with a VHD file (with Windows XP) to a laptop with Windows 10. Install the VirtualBox 5.0.4 virtual machine on the laptop and configure it

Install the VirtualBox 5.0 virtual machine on Windows 10, download link https://www.virtualbox.org/wiki/Downloads
click on VirtualBox 5.0.4 for Windows hostsx86/amd64

We create a virtual machine.
In the main VirtualBox window, click “Create”.

Assign a name to the virtual machine “Windows XP”
choose:
Type: "Microsoft Windows".
Version: "Windows XP (32-bit)".
and click “Next”

If you have at least 6 GB on your laptop RAM, then I advise you to allocate 1GB (1024 MB) of RAM to the virtual machine.

Check the box “Use an existing virtual hard disk” and click on the Explorer button on the right.

In the explorer that opens, we find on the portable hard drive USB drive VHD virtual disk file, select it with the left mouse and click “Open”.

"Create"

The Windows XP virtual machine has been created, launch it, click on it double click left mouse.

But Windows XP most likely won’t boot and here’s why. If only Windows XP was installed on the old computer, then the system boot code is NTLDR, but the Disk2vhd program, when creating a VHD, installs a different boot code - BOOTMGR, which means an XP boot error is inevitable. That is, when loading Win XP you will get a black screen.
Note: some possible solutions problems that may occur when starting a Windows XP virtual machine from a VHD virtual disk file are described at the end of the article.
Restore loading Windows XP can be done in two ways, the first is by using(you can follow the link and check it out), the second - using the original installation ISO image or Windows disk XP (details later in the article).

In the main window VirtualBox select our virtual machine“Windows XP” and click “Configure”

System Tab
Changing the loading order:
1. Optical disk.
2. Hard drive.

Media Tab
The first media is a VHD virtual disk that acts as a hard drive.
The second media needs to be selected; it will be an ISO image of Windows XP.
Select the empty field with the left mouse and click on the disk drive icon.

"Select an image optical disk»

In the explorer that opens, find the ISO image of Windows XP, select it with the left mouse and click “Open”.

The virtual machine is configured.

Let's start the virtual machine.
We press any key on the keyboard, the virtual machine boots from the ISO image of Windows XP.


"Welcome to the installer."
We will restore the system boot using the recovery console, so select “To restore Windows XP using the recovery console, press (R)”
Press (R).
Note: If you have a non-original image of Windows XP, but a pirated assembly, then this option to restore Win XP using the recovery console may not be available and you will immediately be taken to the window new installation operating system, therefore it is very important to always use original Windows images XP from Microsoft.

The Recovery Console opens.
To the question
Which copy of Windows should I sign in to?
Type 1 , press Enter. A message appears:
Enter the administrator password:
Enter the password, press Enter, if there is no password, just press Enter.
Enter fixmbr
The following message appears: **WARNING** There is a non-standard or invalid master boot record on this computer...
Enter y (which means Yes).
A message appears: A new master boot record is being created on the physical disk \Device\Harddisk0\Partition0...
Type fixboot
A message appears: Destination partition: C:. Do you want to write a new boot sector to the C: partition?
Enter y (which means Yes).
A message appears: File system V boot partition:NTFS. The FIXBOOT command writes a new boot sector. The new boot sector was successfully written.


After these recovery steps, Windows XP should boot, but in some cases this does not happen and we again get a black screen when loading XP.
So once again we boot from the ISO image of Windows XP and select “To begin installing Windows XP, press enter ", press Enter on the keyboard.

Accept the license agreement and press F8.

Select "To try to restore a selected copy of Windows XP, press (R)"

The process begins Windows updates XP, your files and programs will not be affected, damaged system files and the operating system loader will be restored.
There are several ways to convert an installed Windows OS into a virtual machine image. The created image can be used, for example, for testing, to check the stability of the system after installing an update, or to record the state of an old machine before making changes.
Most virtualization programs support the function of converting installed Windows OS into virtual machine images. Some solutions already come with built-in functionality, but in some cases you may need to use third-party products for the same purpose.
This guide contains instructions for converting Windows installations into virtual images Microsoft Hyper-V, VirtualBox and VMware.
Migrating Windows OS to a Microsoft Hyper-V virtual machine is easy with Disk2vhd from Sysinternals.
The program is portable, it can be launched from any location on the disk after unpacking the archive. The application requires administrator rights to operate. The program can be used to create a virtual machine from one or more volumes on a computer.
Note: The program can be run in command line mode using the format:
The main application window displays the destination path and file name, and just below it displays the available volumes. Please note that you need to select a target location with sufficient free storage space, otherwise the image creation process will be interrupted.
The user must select the target path and file name (vhdx extension), as well as the volumes to include in the virtual image.
You can only choose Windows partition or even convert non-system partitions to VHD images without selecting the Windows partition.
Disk2VHD comes with two additional options that are specified at startup. The first one sets the output format to VHDX. You can disable this parameter to use VHD.
VHDX has several advantages such as support for larger virtual disks(64 TB vs 2 TB), better protection against damage, remote online resizing, etc. VHD is needed mainly for compatibility purposes, for example when the product does not support VHDX, and also when you want to convert the image to Virtualbox.
The second option allows you to use a shadow copy of the volume.
Disk2VHD processes the selected volumes and turns them into virtual disk images that are saved in the selected location.
Once you have the VHD image, you can use the vboxmanage command line tool that comes with VirtualBox to clone the media and save it in a different format.
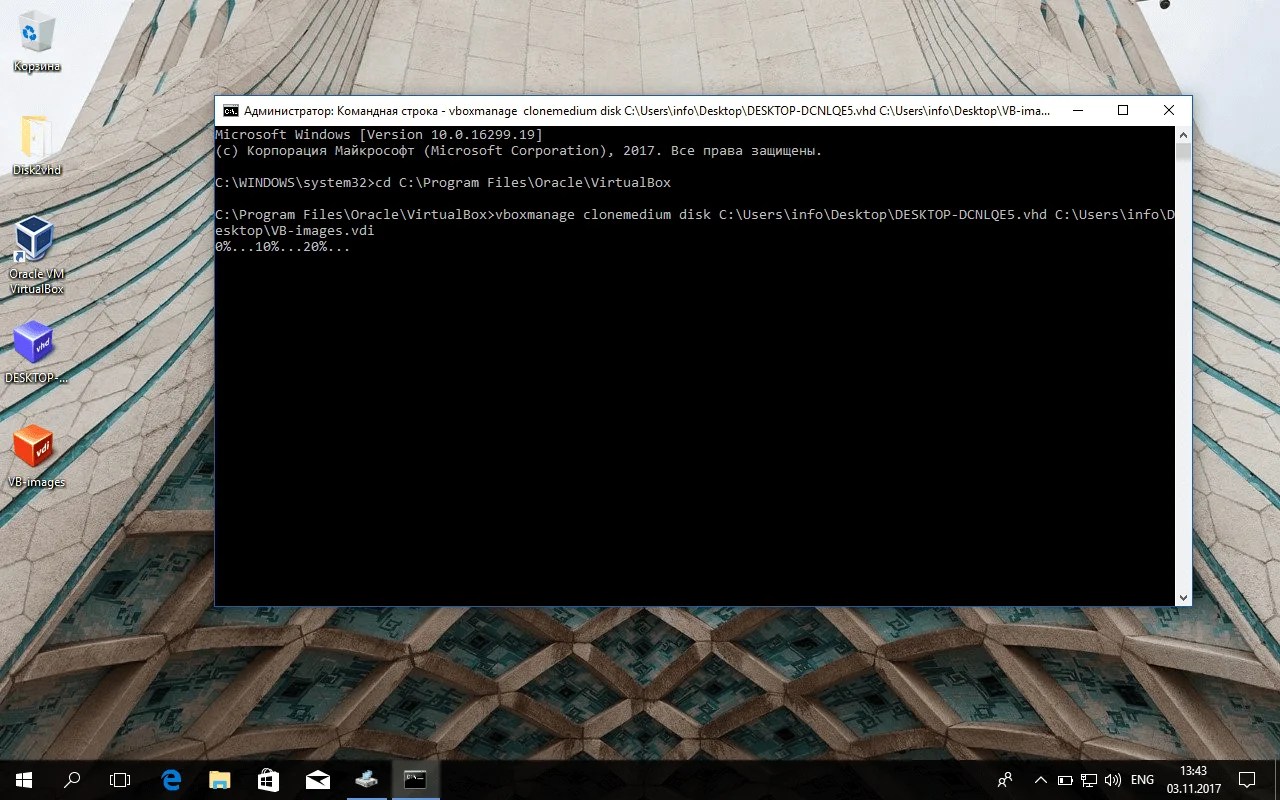
- Press the Windows key, enter cmd.exe, hold Ctrl + Shift and press Enter to run command line with administrator rights.
- Go to the VirtualBox folder on the system, for example, C:\Program Files\Oracle\VirtualBox using the cd command.
- Use the vboxmanage clonemedium disk command to convert a VHD disk image to VDI format. For example: vboxmanage clonemedium disk o:\source.vhd o:\output.vdi
The conversion may take some time depending on the size of the image and your computer's available resources.

You can create virtual images Windows machines for VMware using VMware vCenter Converter. You can download the program from the official VMware website, but this requires account. On our website the utility is available for download without registration.
Note: The program creates a virtual image of the full machine. IN graphical interface there is no way to exclude hard drives or sections.
The installer size is approximately 170 megabytes. During installation, you will be asked to join the Customer Experience Improvement Program.
To convert running system Windows to a virtual image for VMware, select the “Convert machine” option in the main interface of the program to get started.
After loading the wizard, make sure that the source type is set to “enabled” and that “this local computer" You can also create virtual images remote computers, but this requires you to provide the device name or IP address, as well as credentials.
Select the VMware virtual machine in the Target Type section on the next page and select the target folder to save the image.
Creating the image may take some time, depending on the number of volumes, their sizes, and device resources.
Found a typo? Highlight and press Ctrl + Enter
Transfer a configured virtual machine.
The "export configurations" function of the VirtualBox program is designed to create an image of a virtual machine, which can then be imported using another "import configurations" function, for example, after reinstalling the system, transfer it to another computer and, after importing, launch an already configured virtual machine, as well as upload created image to some cloud service.
A virtual machine image is a file with the extension .ova; it is a universal format that can be used in other virtualization programs, such as VMware Workstation or Hyper-V.
Export
Open the alt menu, “File”, “Export configurations”, or press the key combination CTRL + E. In the dialog that opens, the first element will be a list with an expanded selection; if several virtual machines have been created, select the one you need and click the “Next” button, or, if you changed the language in the VirtualBox settings to Russian, “Forward.
By default, VirtualBox saves the image file to the path:
C":\Users\account name\Documents
in Windows 7 and higher, and in XP:
C:\Documents and Settings\*****\MyDocuments
In the next dialog, you can select another folder, for this we will not write anything in the editor, press Tab, get to the button that screen readers call “button”, click. In the “Save As” dialog that opens, write the file name, do not change the file type, select the folder to save, and click the “Save” button, and then, in the export dialog, “Forward”, and in the next dialog, the “Export” button. The export process will begin, its duration will depend on the size of the selected virtual machine.
Import
To call the import dialog, open the alt menu, “File”, “Import configurations”, or press CTRL+I. In the dialog that opens, the focus goes to the editor, in which you need to specify the path to the .ova file, skip this editor, use the button, in the overview that opens, indicate the saved virtual machine image file, press Enter, then, in the import dialog, “Forward”.
In the next dialog in the parameter tree we will not be able to change anything, the “Generate new Macs addresses for everyone network adapters"You don’t have to mark it, click the “Import” button. The import process will begin. After it is completed, the virtual machine can be started.


