The program creates a second partition on an SD card. What to do with excess space on the system disk. What is Link2SD
Many users have encountered the need to change the size of their disks, split them into new disks hard drive or change the file system, this is where a simple Mini program Tool Partition Wizard. .
With Mini Tool Partition Wizard you can do the following:
Change the size of disks on your hard drive;
Create boot sectors of your hard drive, delete them, and even in certain situations restore erroneously deleted ones;
Create hard drive clones with all the information stored on it;
Change the file system of any drive on your hard drive.
Select individual sections hard drive with the appropriate parameters;
Safety of data loss, if the operation occurred in error, you can always restore the necessary data.
Thanks to the built-in elements you can carry out detailed testing and check the performance of the hard drive
The program works with popular file systems, such as: FAT, NTFS, allows you to work with RAID arrays;
Using the program, you can split one disk into several and resize existing partitions.
In addition, you can format existing disks. It even works with disks that are combined into RAID arrays. It is possible to change the file system of a partition from FAT to NTFS, without losing information.
Possibilities:
Creating primary and logical hard disk partitions.
RAID support.
Converting a partition with the FAT file system to a partition with the NTFS file system.
Supports disks and partitions larger than 2 TB.
Copying one of the sections.
Cloning the entire hard drive (creating exact copy on a different physical disk).
The Disk Map option allows you to visually display the partition structure and hard drives.
Recovery boot area MBR.
Changing a dynamic disk to a basic one.
Testing the performance of the hard drive.
Hide/show a section.
Setting the active partition.
Assigning the appropriate letter to the section. Selectively assigning the desired letter to a section at the user's request.
Changing settings serial number section and Type ID.
Align all partitions or a designated partition to optimize hard drive performance
Faster operating speed and high level security
System Requirements:
Windows Server 2000 SP4, 2003, Home Server, 2008 R2, Windows Small Business Server 2003, 2008, 2011,
Windows XP, 2000 Professional, Vista SP2, Windows 7 SP1 andWindows 8, Windows Server 2012(all editions, 32 bit and 64 bit)
Functions and capabilities of the program
Creating a section
Partitioning a section
Deleting a partition
Resizing a Partition
Converting a Partition
Copying a partition
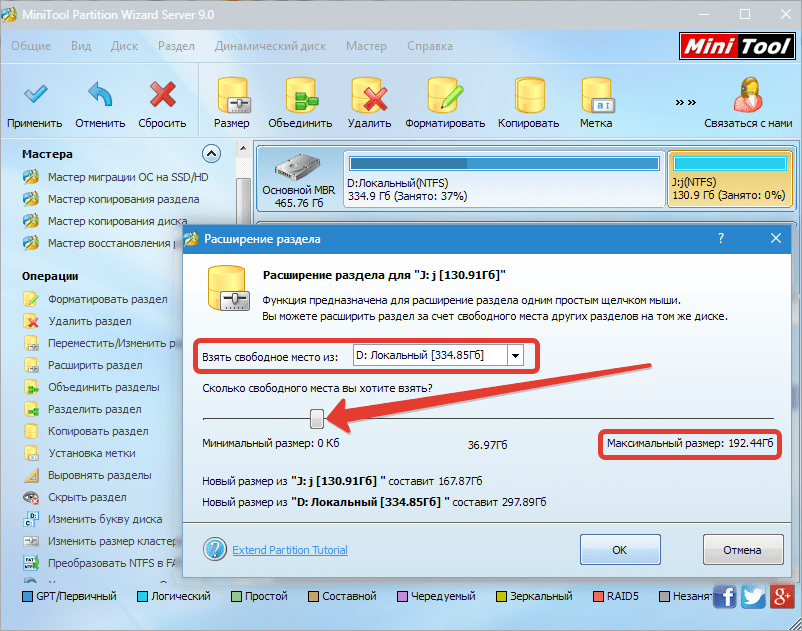
Section expansion
Formatting a partition
Research (view) section
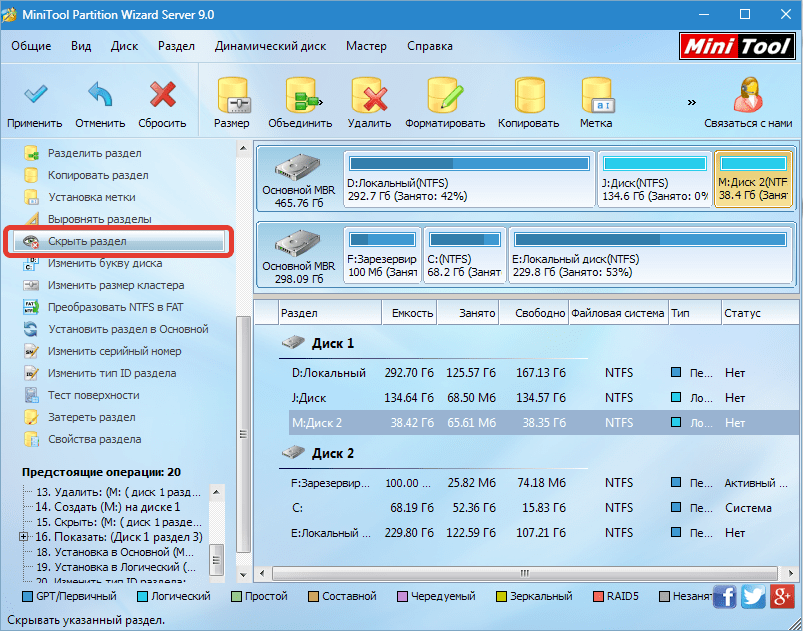
Hide section
Changing the drive name
Make the section active
Partition recovery
In this situation, we are interested in the last function, which we will consider in detail using a specific example.
Partition recovery.
There were 3 partitions on the hard drive: C, D and E. But suddenly D and E disappeared. In disk management there was the following picture:
Instead of partition D, we have an unknown partition, the data of which cannot be accessed. Instead of section E we have empty space. There are problems with the partition table. Launch Partition Wizard.
Select the disk and launch the Partition Recovery Wizard:
Selecting a recovery disk:
It is better to choose scanning the entire disk:
To begin with, select a quick scan; we will always have time to turn to a full scan:
The most crucial moment: viewing the partitions (by double clicking) and marking the partitions that we want to have on our disk. Please note that the existing section C is also marked:
After clicking Finish, a warning will appear because... the second line is unchecked and the corresponding section will be deleted:
We start the execution of the selected operations:
Confirm execution:
In order for drives D and E to appear in the My Computer directory, you need to assign them the appropriate letters. So for drive D:
We assign a letter for E in the same way. As a result, we have:
In some cases, you will need a version of the program on the boot disk
Allows for reconstruction surgery hard section The disk is simple and accessible even for beginners.
Supports both 32 and 64-bit operating systems of the Windows family, that is, Windows XP, Windows 7 and Vista (you can read about what 32/64-bit operating systems are here). Home users will be able to easily perform complex operations with system partitions. Functions include: changing the size (volume) of partitions, copying system partitions, creating new partitions in the system, deleting or formatting a partition, converting partitions, hiding a partition, changing the drive letter (partition), setting the active partition, recovery partition, etc. . The program also supports working with disks and partitions with a memory capacity of more than 2 TB. (terabyte). I think this is more than for a free program.
As for working with this program. I will only describe the procedure that I already described above, namely, increasing the memory capacity of the C: drive. Why not all the features of the program? Because the program has a lot of functions and put it all in one article with detailed description impossible. And I don’t want to simply pour “water” without doing this work myself.
And so... First, let's launch the program itself (I hope you have already downloaded and installed it). An interface will open where everything is in Russian.
Partitioning disks
To begin with, to increase the volume of partition C: from 30 GB to 50 GB we need extra memory 20 GB, which we don’t have. To get it, you need to reduce the size of another partition, say partition E:, by 20 GB. To do this, we launch the program. By launching it, we will see all the disks and partitions that are on your system. I have three partitions in my system: C, E, and D. Select drive E by simply clicking on it once. Next, at the top of the program there is a “Size” button, click on it. You can also click right button mice, from context menu select "Size". A window like this will open.
Reducing the volume of partition memory
Here, in order to reduce the size of the section, drag the right end of the slider to the left and at the bottom in the “Free up space after” field, monitor the volume. When there is approximately 20,000 MB there, it will mean that we have freed up 20 GB from the E: partition.
Increasing the size of the C drive
In it, we drag the left slider to the left, thereby filling it with those megabytes that we took from drive E. And, so that the program has already completed all these operations, click, in the upper left corner, the first “Apply” button in the form of a checkmark. During the process, the program may ask you to restart the computer and will already perform operations to resize partitions in Bios. After the reboot, you will be able to work with the computer.
You can also create new sections in the same way. First, we free up the required amount of memory from any partition, then on the unallocated, freed part, click left button mouse and click on “Create”. In the next window, indicate the letter of the future partition, and leave the rest as default. And click OK, and then “Apply”. That's all. After the reboot, you will be able to work with the new sections you created.
That's probably all there is to it. I think now you can easily change the size of partitions in your system at your discretion, as it is convenient for you.
Note: This program will be very convenient when buying a Laptop, since they often hard drives are not divided into sections.
Attention: When working with a Laptop, you must consider the following nuances:
Before work, be sure to fully charge the laptop, or even better, leave it connected to the power supply, otherwise data loss may occur if you turn it off while the program is running.
Laptops have so-called “secret” partitions designed for system recovery. You need to work with them more carefully or not touch them at all.
Among other things, I warn you that if your disk is on a laptop, and even on desktop computer, is packed to capacity, then I think in any case it will not work without data loss. Therefore, before doing this, save the data that is important to you on some removable media.
If, after resizing the disk, the system requires you to format the disk, then simply restart the computer and the disk will work as it should.
Introduction:
Target:
Instructions:
Step 1
Step 2
Opening 
Step 3

Step 4


Step 5

Feel free to click “OK” and move on. 
Step 6


p.p.s. All manipulations with the SD card are at your own discretion! Remember, the more applications you transfer to a flash drive, the less life you leave for it! Transfer only “heavy” applications and applications that you rarely use!
PapaRoach PapaRoach
![]()
26 liked
- Introduction:
I quite often get asked questions about how to create a partition on a memory card for transferring applications, for example, using a program such as .
And for this reason, I decided to write a short instruction on how to properly divide a flash drive into sections for those who have difficulties. Maybe many people don’t need it anymore, but as statistics show, there will always be questions)))
Target:
Divide the flash drive into 2 partitions FAT32 and EXT2.
FAT32 - partition for your data.
EXT2 - section for portable applications on the card.
The current size of the EXT2 partition is 32-512MB. There is no point in doing more than 512MB! But if you suddenly want more, then keep in mind that the size of the EXT2 partition should occupy no more than 90% of the total volume of the card!
Instructions:
First, we need to acquire a program for creating partitions on disks. I personally used it, and I advise you, the program is free and convenient.
Step 1
Insert the SD card into the card reader. We automatically connect the card reader to the computer. If necessary, we make a backup of data from a flash drive, because... When dividing, all data will be erased!
Step 2
Opening MiniTool Partition Wizard Home Edition, find our map and delete the section by clicking "Delete" in the context menu:
Step 3
Next, click “Create” on the unallocated space of the map:
A window will open in front of us where we will configure the section parameters.
Step 4
First, we create a partition of type FAT/FAT32, which will store your usual data such as photos, music, and all sorts of files. This will be a section tailored to your needs.
To do this, in the "File System" item, select the type FAT or FAT32:
For cards up to 2GB, it is recommended to choose the FAT type. If the card is 4GB or more, then select the FAT32 type.
Next, in the “Create As” item, select the “Primary” item:
In the "Drive Letter" item, the volume letter is assigned (this is like the letter local disk etc.). You can also enter the name (label) of your partition in the “Partition Label” column. I named it "SDCARD" for example.
Then in the “Partition Size” item, select the size of our partition and click “OK”:
Step 5
Similarly, click the “Create” item on the unallocated area of the map and now create a section on which the applications transferred to the SD card will be stored.
In this case, a warning window like this may pop up:
Feel free to click “OK” and move on.
But now in the “File System” column we select the type EXT2 or EXT3:
In the “Create As” item, select “Primary” again, enter a label name if you want, and the size of the partition will be the rest of the map. And click "OK".
Step 6
Now click the “Apply” button in the upper left corner and agree to the changes:
Afterwards the processing process will start and, if everything is successful, a window will pop up:
The process is over! If you made a backup, then we throw the data back onto the FAT32 partition (although you will only see it in the computer explorer) and insert the flash drive into the device and use it to your health!
p.s. I don't pretend to be universal. We write about errors and other things in the comments. Glad if it helped someone.
p.p.s. All manipulations with the SD card are at your own discretion! Remember, the more applications you transfer to a flash drive, the less life you leave for it! Transfer only “heavy” applications and applications that you rarely use! ">
Hello friends, today I want to write a review of an interesting program from foreign developers called MiniTool Partition Wizard. I’ll say right away that the program allows you to work with disks. Now we’ll talk about what it is, what capabilities it has.
New review of version 10.2 -
Backup utility -
What can the program do? It can merge partitions, convert disks, delete or format partitions, and has secure erase.

- Ability to convert drive from and vice versa.
- Ability and vice versa.
- Copy volumes.
- Copy boot disks.
- UEFI boot support.
- Supports disks with 4 KB sectors.
- Changes the cluster size without affecting the data.
- Merge partitions without damage.
And this is just a small part of the functions that are available in the program.
As I said above, there are several editions of this utility.
Free Edition. Free version which includes standard features formatting, converting, resizing partitions and more.
Professional Edition. The same functions are available, plus it allows you to create bootable CDs or flash drives. This is useful if problems arise with the operating system and you cannot work with disks. There are more opportunities than in free version.
Server Edition. This type the programs can be used in a commercial environment. Version developed for Windows Server and Windows PC, all functions previous versions available.
Enterprise Edition. This version is aimed at enterprises, but almost the same functions are available. Can be used on an unlimited number of computers.
Technician Edition. This version has no restrictions and is suitable for all types of Windows OS, absolutely all functions are available. The version costs $699.
Bootable CD. A special program for creating bootable CDs, the same as in the built-in functions of previous versions.
Thus, we have analyzed the program for working with disks. You can download MiniTool Partition Wizard for Windows XP, 7, 8 and Windows 10. The interface is very nice and simple, everything is intuitive. If you have any questions, you can go to the official website of the program and find out information from the developers.
I would like to write a few words about an interesting utility for working with disks and SSDs - MiniTool Partition Wizard. Firstly, it has been updated to version 10.2, which means there is something new that we should now know about. Compatibility with Windows 10 has also appeared, so you should not expect any crashes or bugs from the program. Now Partition Wizard has quite great rating and it has already been downloaded by more than 20 million users.
You can download it from the official website.
A year ago I already wrote and described the functionality, but let’s take a closer look.
The utility has many features to optimize the use of disk space and protect your data. You can work with partitions and disks and perform manipulations such as resizing a partition, copying a disk, scanning lost partitions, . Very often a problem arises and vice versa, so the program can do this.
Availability of features such as checking the disk for bad sectors, and this, by the way, is very important and you don’t need to look for additional utilities to format the disk at the same time. The MiniTool Partition Wizard utility has all this, so to speak, ten in one.
Of course, not much is available in the free version, but purchasing PRO version will allow you to take advantage of all the functions. Now there are 5 versions of this utility: Free, Professional, Server, Enterprise, Technician. To access all functions, it is enough to have a professional edition.
What does the PRO version have that the free version doesn't?As you can see, the professional version has a lot of functions that are not available in the free version, I think it makes sense to buy the program. To avoid paying $39 or $59 for a license forever, you can purchase the professional edition forever for $99, and I think that's a smart decision. Moreover, the license is tied to 3 PCs. Of course, you first need to test the utility and understand its effectiveness, that’s why there is a FREE version, and then decide whether to buy it or not.
Another disadvantage of the professional version is that you cannot use it on Windows Server; for this you need to buy a special version.
The good thing about the program is that it has a lot of functions and capabilities, a whole set is collected in one and you don’t need to download ten utilities that only do their job. Of course, it is still unknown how effective each of the program’s functions is, but this is a matter of time, especially since so many people use the utility.
Let's now summarize how many functions there are in the program:
- Creating and deleting partitions;
- Formatting partitions and disks;
- Changing the partition label;
- Moving and resizing partitions;
- Expanding partitions;
- Partitioning without data loss;
- Erasing data;
- Section Study;
- Setting the partition as logical or primary;
- Copying partitions;
- Merging sections;
- Transferring the system to SSD or HDD;
- Convert from MBR to GPT and vice versa;
And many more functions. Well, what do you say? The program is just great. In the following articles I will try to describe the operation of several functions. For example, I already wrote, . That's all, good luck.
MiniTool Partition Wizard is professional software for working with partitions on physical disks. Allows you to create, merge, split, rename, copy, resize and delete volumes.
Among other things, the program formats partitions and converts file NTFS system to FAT and vice versa, works with physical drives.

MiniTool Partition Wizard can create partitions on empty drives or unused space.
When performing this procedure, the partition is assigned a label and letter, a file system type, and the cluster size is set. You can also specify the size and location.

This function allows you to create a new partition from an existing one, that is, simply cut off the space necessary to create it.

The program formats the selected partition by changing the logical drive letter, file system and cluster size. All data is then deleted.

MiniTool Partition Wizard allows you to move existing partitions. To do this, just specify the amount of unallocated space before or after it.
The size can be changed using the slider or indicated in the corresponding field.

When expanding a volume free space“borrows” from neighboring sections. The program allows you to choose from which partition the required space will be cut off, its maximum allowable volume, and also indicates the new dimensions.
MiniTool Partition Wizard merges the target partition with the adjacent one. In this case, the new volume is assigned the letter of the target volume, and the adjacent files are placed in a folder on the target volume.
Copying partitionsCopying the selected partition of one physical disk is only possible to the unoccupied space of another.

In MiniTool Partition Wizard you can assign a label (name) to the selected partition. Not to be confused with volume letter.

This function allows you to change the letter for the selected partition.

Reducing the cluster size can provide more effective work file system and rational use of disk space.

The program allows you to convert the file system of an NTFS partition to FAT and vice versa without losing information.
It must be remembered that in file system FAT has a file size limit (4GB), so before converting you need to check the volume for such files.

The wipe function allows you to completely delete all data from a volume without the possibility of recovery. For this purpose, algorithms with varying degrees of reliability are used.

MiniTool Partition Wizard removes a partition from the list of devices in the Computer folder. This is done by removing the drive letter. However, the volume itself remains untouched.
Using this function, the program checks the partition space to detect read errors.

The program performs the same operations with physical drives as with volumes, with the exception of formatting and some specific actions intended only for partitions.

The wizards will help you perform some operations step by step.
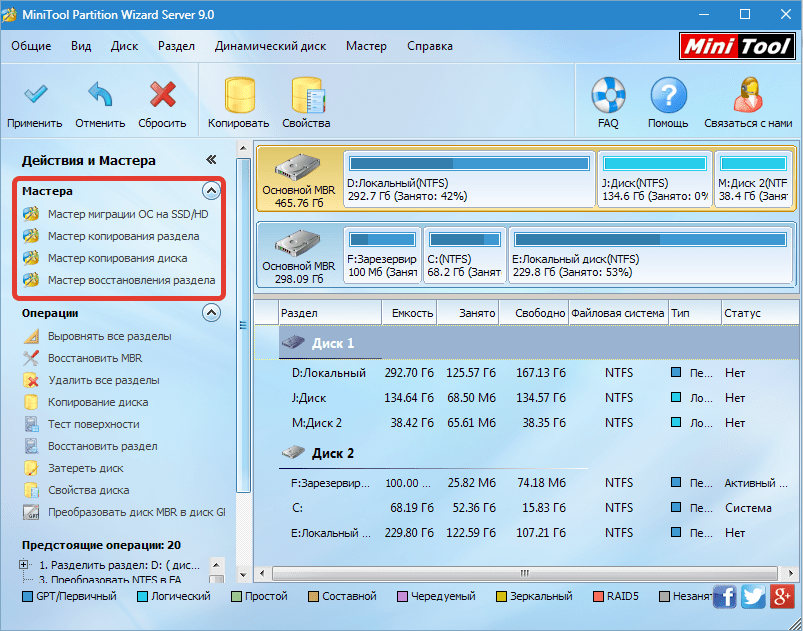
1. The OS Migration Wizard to SSD/HD helps your Windows “move” to a new drive.
2. Copy Partition/Disk Wizards help you copy the selected volume or physical disk, respectively.
3. The Partition Recovery Wizard restores lost information on the selected volume.
Help and support
Help for the program is hidden behind the “Help” button. Reference data is available in English only.

Clicking on the “FAQ” button opens a page with popular questions and answers on the program’s official website.


