How to restore the download folder if you accidentally deleted it. Recovering a deleted file or folder. Ways to recover a deleted file or folder
Hello dear readers of the blog site
Who among you has not encountered such an unpleasant situation when a folder with files was accidentally deleted? This article provides several effective ways recovering deleted files that not everyone knows about.
If you accidentally deleted some necessary folder or its contents from your computer, for example, from your desktop or somewhere else, do not despair and do not rush to search for recovery programs on the Internet; they cannot always help you. 
From my own experience, I can say that when I was on my computer, I accidentally deleted one document that was very important to me. By using special utility I still managed to restore it, but only the text part, the graphic part, to my regret, was lost.
This is the second time my child has done such a thing that I have been returning deleted folders for several days. different programs, but the result was disappointing. More than 60% of all information could not be recovered; it was completely lost!
(After this incident, I gave each family member their own separate one). I used, of course, free software and that may be why I got such a disastrous result; I can’t say what paid utilities are like. Here's how to use the standard ones Windows features I know and teach you with 100% results!
Recovery methods
- Cancel actions
A deleted folder or file can be returned using the hotkey combination Ctrl + Z. Or, by analogy, right-click the mouse in the directory of the deleted object (a directory is a folder for files or any disk will also be a directory for folders) and click the Undo deletion tab. But this method will only work immediately after removal.

2. Restore from Recycle Bin
If the deletion was made earlier, then it makes sense to check the trash. We find the deleted object in the trash, right-click on it in the menu that appears, and select Restore.

This method will not work if you deleted the file bypassing the trash using Shift keys+ Delete or, the trash has already been emptied previously. But don’t despair, the following 2 methods will even help you recover a folder deleted from the Recycle Bin.
3. Restore from a previous version
Using the example of a folder located on the desktop (or any other place on the computer, no matter the algorithm of actions is the same), in my case it is 5555 - I delete it.

Right-click on the trash can ⇒ Clear.
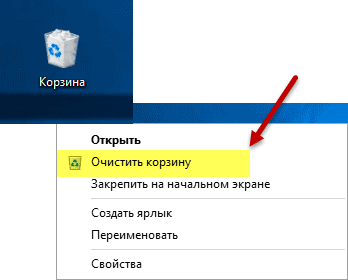
Everything, it would seem, my folder is irretrievably lost if it is not in the trash, but this is not so and now you will see it!
Open My Computer or Start menu ⇒ Find Explorer Desktop RMB call context menu select the Properties tab.

In the window that opens, select Previous versions. As shown in the screenshot, I have several of them in one of the folders and the objects you need will be found.

By double-clicking LMB I open the saved versions of the desktop, where I see my daddy 5555 safe and sound! Now I just need to drag it onto the desktop or copy it, then paste it into the place I need.

4. Restore from archive
In order to use this method, you must have archiving configured. The article describes everything in detail how to use it, and most importantly, why it is so necessary to set up archiving and what is its importance for the user.
That’s all for me today, I hope this article has saved many people’s nerves and a lot of time now by accident remote folder or its contents can be restored at any time without any problems in just a couple of clicks.
Good luck and be careful.
If you have any questions, I’ll be happy to help!
And for clarity, watch the video on this topic.
Valery Semenov, website
Folder windows loading 7 is found quite quickly if you have an idea where to look for it. We will talk about this sometimes elusive folder.
Download folder in windows 7 is usually located on the “C” drive, and in order to get into it we must go along one of two paths. Hello everyone on the blog we'll talk about the download folder in the operating room windows system 7
So the first path goes through the program "Conductor", whose icon is usually located to the right of the Start button on the taskbar. Open File Explorer and then the download folder in the upper left corner. Next, through drive “C”, where we open the folder “Users” -> “Your account” -> “Downloads” folder.

If you have less and less free space on drive “C”, then as a consequence this leads to a limitation on the size of downloaded files. To solve this problem you need to move this folder to another drive
How to move the download folder
So, to move the download folder to another location, you need to do the following:
- open drive “C”;
- folder "Users";
- yours Account»;
- open the “Downloads” folder;
- right click mouse open “Properties”;
- then "Location".


All downloadable windows files saves in the download folder, which many users access through the Start menu or desktop shortcut. If the shortcut disappears, then you can open “Explorer” and go to “C:\User\your username\”. This is where you will most likely find the download folder.
If you have done these steps and the result does not work, then click on “run”, enter “cmd” in the window that opens and confirm by clicking on . In the window that opens, type the command “attrib –s –h C:\users\your username\downloads”.
 Restore your downloads folder. Using the command line you can restore the disappeared downloads folder
 Replace the words “your username” with the name you use. Click on . windows will restore the downloads folder again. After this, we recommend checking your computer for viruses, since their presence could lead to the deletion of the downloads folder.
Andrey Kireev
ichip.ru
How to restore your Downloads folder?
If the Downloads folder has disappeared as a given from your computer running Windows OS, then a virus is most likely to blame. Launch immediately antivirus program and scan the system.
Now is the time to start restoring your Downloads folder. The first place you need to look is to go to the Start – Explorer directory. Right-clicking will create a shortcut to the Downloads folder on the Desktop.
If according to the specified address desired folder no, you need to go through the chain: C:/User/PC username. The Downloads folder should be here.
If this doesn't help, open it command line by entering the command – cmd – into the directory search line. Confirm the action by clicking Enter.
In the interface that appears, enter the command attrib –s –h C:\users\PC username\downloads. Confirm the command again with the Enter key.
The Downloads folder should appear in Windows Explorer
Anonymous 09/06/2016 5293 views. Overall rating: 0
www.webowed.net
Download folder in windows 7
 The download folder in Windows 7 is usually located on the “C” drive, and in order to get to it we must follow one of two paths. Hello everyone, on the blog for novice computer users, we will talk about the download folder in the Windows 7 operating system.
So the first path goes through the “Explorer” program, the icon of which is usually located to the right of the “Start” button on the taskbar. Open File Explorer and then the download folder in the upper left corner. Next, through the “C” drive, where we open the “Users” folder -> “Your account” -> “Downloads” folder.
If you have less and less free space on drive “C”, then as a consequence this leads to a limitation on the size of downloaded files. To solve this problem you need to move this folder to another drive.
How to move the download folder
So, to move the download folder to another location, you need to do the following:
- open drive “C”;
- folder "Users";
- your “Account”;
- open the “Downloads” folder;
- right-click to open “Properties”;
- then "Location".
 And then, as in the screenshot, we change the address to which it should be moved. In this case, I changed my drive letter from “C” to “D”.

Now you know where to look for the download folder in Windows 7 and the file downloaded from the Internet.
And if your laptop suddenly stops turning on, then by clicking on the link you can correct this misunderstanding.
The Downloads folder in the Dock is extremely convenient for quick access to downloaded files. If you accidentally deleted it or it otherwise disappeared from the Dock, you'll probably want to return it to its original location. Fortunately, returning the Downloads folder icon to its original location is quite simple. You can also add other folders to the Dock using the method below.
1. Open Finder on MacOS.
2. From the drop-down menu, select Transition -> Personal.

3. Drag the folder "Downloads" in the directory Personal to the right edge of the Dock (behind the strip next to the trash can).

That's all. Folder "Downloads" returned to the Dock. This method can also be used to restore other folders in the Dock.
Alternative: select the desired folder and use the keyboard shortcut Control + ⌘Cmd + ⇧Shift + T.
While having a folder "Downloads" The Dock is very convenient; downloaded files can be accessed in other ways, for example, through the Finder, search bar, using hotkeys, etc. Of course, you can return to the default Dock settings, which will also return the folder to its place, but in this case all your settings will be lost, including the order of applications.
No need to write files or install programs on hard drive or a USB flash drive containing the information you want to recover. This is connected with the principle of deleting information, the fact is that when you click on the “delete” button, the information is not actually deleted, but only its header is erased, the file or folder itself remains, but the next time it is written to a disk or USB, it is replaced in the place where the remote file is located or the folder is being written to new information, the old one can no longer be restored.
Ways to recover a deleted file or folder.
1) Check cart
The first and simplest thing to do is check the Trash to see if there is any remote file or folders. To do this, click on the Recycle Bin shortcut on your desktop and if you see a file or folder there that you accidentally deleted, right-click on it and select "Restore". The data will be restored to the same location where it was before it was deleted.
If you are unlucky and you do not find the deleted file or folder in the trash, then you need to use one of the recovery programs described below
2) Use the free data recovery program Recuva.
First of all, go to the site Recuva and download latest version programs. Then you start the installation of the downloaded program, the installation process is very simple, the first step is to select the installation language.

Then we specify additional parameters (whether to create a shortcut on the desktop, whether to search for program updates...), you can leave them as default. Please note that if the deleted file was on the disk where it was installed operating system(often drive C), then Recuva program You should not install it on this disk, otherwise by installing it you may overwrite the file and it will not be possible to restore it. To select a different drive to install the program, click the button "Additionally" and specify a different installation path for the program.

After this you will be prompted to install Google browser Chrome, if you do not want to install, uncheck the box.

After installation, the Recuva wizard will launch to help you recover your files or folder. I strongly recommend using the wizard, as it is more understandable and convenient. Click "Next"

Selecting the type of recovered file

Select the location where the file or folder was located.

Put a tick "Enable in-depth analysis", press "Begin".

After this, the search for files will begin, this can take up to several tens of minutes, depending on many factors (computer power, disk space or USB devices, disk speed, USB device, etc.).
After searching, you will see a list of files that can be recovered. If you want to get more detailed information about files, you can click on the button "Go to advanced mode".

To restore a file, check the boxes next to them and click the button "Restore", then indicate where to restore the file and within a few seconds the file will be restored. 
3) Using the paid program EasyRecovery.
I, like many, am for free software, but in this article I will describe file recovery using a paid program, since during my test recoveries this program saw more deleted files than Recuva (2385 files versus 2461). I would recommend using this program if the free one did not help. You will still not lose anything, since with this program you can find deleted files for free, you just need to restore these found files and folders license key.
So, first of all, download the latest version of the program EasyRecovery (V in this example I will use the Home version). Install... the process is not complicated, we agree with everything and click "Next", let me remind you that the program must be installed on a volume (disk) from which you will not restore the file or folders, since you can overwrite the file or folder being restored. After installation, run the program, the first window will appear is the licensing window, which you can skip if you click "Run as a DEMO". The first EasyRecovery window appears in front of us, click "Continue".

In the next window, select the location where the file that needs to be restored is located.

The next step is to select a recovery scenario. If the file or folder was simply deleted, it is recommended to select "Deleted File Recovery" , if hard drive/ USB flash drive have been formatted must be selected "Formatted Media Recovery".

After this, an information window will appear in which all the specified search settings are indicated, if you have not confused anything, click "Continue".

The search for files will begin, this process may take quite a long time, depending on the size of the volume hard drive or USB device, computer power, etc. After the entire disk or USB flash drive is scanned, all deleted files will appear in front of you, divided into groups depending on the extension. If you click on a file and try to open the file (Open) or save it (Save as), you will be prompted to enter a license key; without it, the file will not be restored.
I hope so step by step guide helped you recover your files and folders, saving a lot of time and possibly money. In the future, I recommend using backup of important files, if possible, store important files on several media or at least in different folders.


