Android firmware using the FastBoot utility. What are the Adb and Adb run programs - basic commands and how to use them Why does adb not see a switched off phone
Experienced owners of Android devices quite often use the ADB and Fastboot programs included in the Android SDK to unlock the bootloader of their tablets and smartphones, install custom firmware, obtain root rights and much, much more.
However, one “fine” day you may find that after you have connected your Android device to the PC and typed the usual “adb devices” command in the command line window, the list of devices connected to the computer that this program should display is empty. What to do in such cases to correct the situation?
If this happens to you, then first of all you need to check the following:
1. Check if it is enabled in your tablet's settings
2. Check that the USB cable you are using to connect to your computer is working and connected correctly
3. Check if you have the Android SDK installed and updated to the latest version to date
4. Try switching the connection mode of your tablet or smartphone from media device (MTP) to camera (PTP) or vice versa.

You may ask - why do all this if the device worked fine before? There can be many reasons for such a situation. For example, you updated the operating system on your PC and forgot to install the Android SDK, or you haven’t updated the SDK for a long time, or you connected your tablet or smartphone not with the proprietary cable that came with it, but with a longer one purchased later in order to make it easier to use the device is charging, or – the USB drivers of your device are not installed correctly.
Speaking of drivers. If you checked all of the above, but it did not help you and the ADB program still does not see your device, try removing it from the system and reinstalling it again.
To do this, on a computer with a tablet or smartphone connected to it, open the device manager and find the device with “Composite ADB Interface” in the name. For example: "Android Composite ADB Interface" or "Google NexusADB Interface"

Then right-click on the device and select the “Delete” option in the menu that opens.

Disconnect your tablet or smartphone from your computer, confirm the removal by clicking on the “OK” button and after completing the device removal process, reconnect it and wait until Windows installs it again. After this, your tablet or smartphone should appear in the list of devices connected to the computer in the ADB program.
Android firmware, i.e. writing certain file images to the corresponding sections of the device’s memory using special Windows software that almost completely automates the process is today not the most difficult procedure from the user’s point of view. If using such tools is impossible or does not give the desired result, Fastboot saves the situation.
In order to flash an Android device via Fastboot, you will need knowledge of the console commands of the same mode of operation of the device, as well as certain preparation of the smartphone or tablet and the PC used for operations.
Due to the fact that in fastboot mode, manipulations with the device’s memory sections are performed virtually directly, when using the firmware method described below, some caution and attentiveness are required. Additionally, the following steps should probably only be recommended if you are unable to flash the firmware using other methods.
The user carries out every action with his own Android devices at his own peril and risk. The site administration is not responsible for possible negative consequences of using the methods described on this resource!Preparation
Strict implementation of the preparatory procedures determines the success of the entire process of flashing the device, so the implementation of the steps described below can be considered a prerequisite before carrying out operations.
Installing drivers
System backup
If there is the slightest possibility, before flashing the firmware, be sure to create a full backup copy of the existing partitions of the device’s memory. The steps required to create a backup are described in the article: How to backup an Android device before flashing it
Downloading and preparing the necessary files

This add-on allows you to perform all the operations from the examples described below in a semi-automatic mode and without having to resort to manually entering commands into the console.

Rebooting the device into bootloader mode
1. In order for the device to accept commands sent by the user via Fastboot, it must be rebooted into the appropriate mode. In most cases, it is enough to send a special command via adb to the device with USB debugging enabled:
adb reboot bootloader
2. The device will reboot into the mode required for firmware. Then we check that the connection is correct using the command:
fastboot devices
3. Rebooting into fastboot mode can also be done using the corresponding item in (“ Reboot»).

4. If the above methods for switching the device to fastboot mode do not work or are not applicable (the device does not boot into Android and does not enter recovery), you must use a combination of hardware keys on the device itself. For each model range, these combinations and the order of pressing the buttons are different; unfortunately, there is no universal way to enter.
Just for example, you can consider the products of Xiaomi. In these devices, loading into fastboot mode is carried out by pressing the button “ Volume-" and, while holding it, the keys " Nutrition».

Let us note once again that other manufacturers have different methodology for entering fastboot mode using hardware buttons and their combinations.
Unlocking the bootloader
Manufacturers of a certain number of Android devices block the ability to manage device memory sections by locking the bootloader. If a device has a locked bootloader, in most cases flashing its firmware via fastboot is not possible.
To check the status of the bootloader, you can send the following command to the device, which is in fastboot mode and connected to the PC:
fastboot oem device-info
But again we have to admit that this method of determining the blocking status is not universal and differs for devices from different manufacturers. This statement also applies to unlocking the bootloader - the methodology for carrying out the procedure differs for different devices and even for different models of the same brand.
How to unlock Bootloader
- How to unlock the bootloader - HTC
- How to unlock the bootloader - Nexus
- How to unlock the bootloader - Sony
- How to unlock the bootloader - Xiaomi
- How to unlock the bootloader - Huawei
- How to unlock the bootloader - LG
Writing files to device memory sections
Having completed the preparatory procedures, you can proceed to the procedure for writing data to the device’s memory sections. Once again, we double-check that the image files and/or zip packages are loaded correctly and that they correspond to the device being flashed.
Attention! Flashing incorrect and damaged file images, as well as images from another device into the device leads in most cases to the inability to load Android and/or other negative consequences for the device!Installing zip packages
To write to the device, for example, OTA updates, or a complete set of software components distributed in the format *.zip, the fastboot command is used:
update1. Make sure that the device is in fastboot mode and is correctly detected by the system, and then we clean up the partitions " cache" And " data" This will delete all user data from the device, but in most cases it is a necessary step, as it allows you to avoid many errors during the firmware and further operation of the software. We execute the command:
fastboot –w
2. Write down the zip package with the firmware. If this is an official update from the manufacturer, the command is used:
fastboot update update.zip
In other cases we use the command
fastboot flash update.zip3. After the inscription “ finished. total time…."The firmware is considered complete.
Writing img images to memory partitions
In many cases, searching for firmware in the format *.zip may be difficult to download. Device manufacturers are reluctant to post their solutions on the Internet. In addition, zip files can be flashed through recovery, so the advisability of using the method of writing zip files through fastboot is questionable.
But the ability to flash individual images into the appropriate sections, in particular “ boot», « system», « userdata», « recovery"etc. via Fastboot when restoring the device after serious software problems, can save the situation in many cases.
To flash a separate img image, use the command:
fastboot flash partition_name file_name.img1. As an example, let's write down the recovery section via fastboot. To flash the image recovery.img To the appropriate section we send the command in the console:
fastboot flash recovery recovery.img
2. Other sections are flashed in a similar way. Writing an image file to the section " Boot»:
fastboot flash boot boot.img
« System»:
fastboot flash system system.img
And in the same way all other sections.
3. For batch firmware of three main sections at once - “ boot», « recovery" And " system"you can use the command:

4. After completing all procedures, the device can be rebooted into Android directly from the console by sending the command:
fastboot reboot
In this way, the firmware is flashed using commands sent via the console. As you can see, the preparatory procedures take more time and effort, but if they are performed correctly, writing sections of the device’s memory occurs very quickly and almost always without problems.
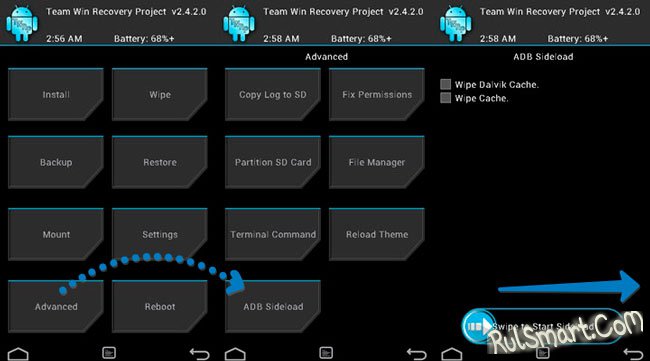
How to update if Recovery does not have the required item (for example, apply update). The update can then be done using ADB Sideload. Let us recall that there are several trivial ways to obtain the update and apply it:
- Over-the-air (OTA) update, if the manufacturer took care of releasing and distributing the update file in such a convenient way
- Update via Recovery, when you download the update file and select it via Recovery (for example, using the “apply update” item).
What to do?
First, install the basic drivers so you can get started with Sideload. Next, unpack the archive with ADB to the root of drive C, and place the update there.
Note: you do not need to unpack the update archive.
How to update via Sideload?

First, boot your device into Recovery mode (usually, you need to turn off the device and hold down the Vol (-) + Power or Vol (+) + Power keys).
Select "Apply update from sideload". Wait for the “Now send the package adb” item to appear, and then connect the USB cable to the PC.
On your computer, launch the command line to run the necessary commands:
- cd c:/adb - after cd, enter the location of the folder with ADB (specify the path to it)
- adb sideload filename.zip - instead of filename, enter the name of your update archive
After applying these commands, the update file will be downloaded and installed on your Android. Thus, you can flash not only OTA updates, but also full-fledged firmware (official ones, of course, which are intended for stock recovery).
Android firmware, i.e. writing certain file images to the corresponding sections of the device’s memory using special Windows software that almost completely automates the process is today not the most difficult procedure from the user’s point of view. If using such tools is impossible or does not give the desired result, the situation can be saved.
In order to flash an Android device via Fastboot, you will need knowledge of the console commands of the same mode of operation of the device, as well as certain preparation of the smartphone or tablet and the PC used for operations.
Due to the fact that in fastboot mode, manipulations with the device’s memory sections are performed virtually directly, when using the firmware method described below, some caution and attentiveness are required. Additionally, the following steps should probably only be recommended if you are unable to flash the firmware using other methods.
The user carries out every action with his own Android devices at his own peril and risk. The site administration is not responsible for possible negative consequences of using the methods described on this resource!
Strict implementation of the preparatory procedures determines the success of the entire process of flashing the device, so the implementation of the steps described below can be considered a prerequisite before carrying out operations.
Installing drivers
You can learn how to install a special driver for fastboot mode from the article:
System backup
If there is the slightest possibility, before flashing the firmware, a full backup copy of the existing partitions of the device’s memory must be created. The steps required to create a backup are described in the article:
Downloading and preparing the necessary files
Fastboot and are complementary tools from the Android SDK. We download the entire toolkit or download a separate package containing only ADB and Fastboot. Then unpack the resulting archive into a separate folder on drive C.

Through Fastboot it is possible to record both individual sections of the memory of an Android device and firmware updates as a whole package. In the first case, you will need image files in the format *.img, in the second – package(s) *.zip. All files that are planned for use must be copied to the folder containing unpacked Fastboot and ADB.

Packages *.zip do not unpack, you just need to rename the downloaded file(s). In principle, the name can be anything, but should not contain spaces or Russian letters. For convenience, you should use short names, for example update.zip. Among other things, it is necessary to take into account the fact that Fastboot is case-sensitive in sent commands and file names. Those. “Update.zip” and “update.zip” for fastboot are different files.
Launching Fastboot
Since Fastboot is a console application, working with the tool is done by entering commands of a specific syntax into the Windows command line (cmd). To launch Fastboot, the easiest way is to use the following method.


This add-on allows you to perform all the operations from the examples described below in a semi-automatic mode and without having to resort to manually entering commands into the console.


Unlocking the bootloader
Manufacturers of a certain number of Android devices block the ability to manage device memory sections by locking the bootloader. If a device has a locked bootloader, in most cases flashing its firmware via fastboot is not possible.
To check the status of the bootloader, you can send the following command to the device, which is in fastboot mode and connected to the PC:
fastboot oem device-info

But again we have to admit that this method of determining the blocking status is not universal and differs for devices from different manufacturers. This statement also applies to unlocking the bootloader - the methodology for carrying out the procedure differs for different devices and even for different models of the same brand.
Writing files to device memory sections
Having completed the preparatory procedures, you can proceed to the procedure for writing data to the device’s memory sections. Once again, we double-check that the image files and/or zip packages are loaded correctly and that they correspond to the device being flashed.
Attention! Flashing incorrect and damaged file images, as well as images from another device into the device leads in most cases to the inability to load Android and/or other negative consequences for the device!
Installing zip packages
To write to the device, for example, OTA updates, or a complete set of software components distributed in the format *.zip, the fastboot update command is used.

Writing img images to memory partitions
In many cases, searching for firmware in the format *.zip may be difficult to download. Device manufacturers are reluctant to post their solutions on the Internet. In addition, zip files can be flashed through recovery, so the advisability of using the method of writing zip files through fastboot is questionable.
But the ability to flash individual images into the appropriate sections, in particular "boot", "system", "userdata", "recovery" etc. via Fastboot when restoring the device after serious software problems, can save the situation in many cases.
To flash a separate img image, use the command:
fastboot flash partition_name file_name.img


In this way, the firmware is flashed using commands sent via the console. As you can see, the preparatory procedures take more time and effort, but if they are performed correctly, writing sections of the device’s memory occurs very quickly and almost always without problems.
A fairly common problem in Android is the waiting for device error when working with ADB or Fastboot, in this article we will learn how to fix it!
What is this waiting for device?
This error is not really an error, if we literally translate this phrase - waiting for the device to connect. That is, when you try to do something in ADB or FASTBOT and you get the message waiting for device in the command line, it means that your Android smartphone or tablet is not visible!
Message - adb or fastboot does not see the connected Android device!
To make it clear what this article is about and to understand what we are talking about, it is advisable to read the following articles:
- Otladka via USB
Although almost all the reasons for the message are solved in the same way, for convenience, the article will be divided into the solution “waiting for device in adb” and “waiting for device in fastboot”.
Solution waiting for device in ADB
1. The first thing you should pay attention to is whether you have the driver installed?
You can download the driver here page how to install find out on this link. If the driver is unsigned, then Windows must be restarted by disabling verification. Certain devices require a special ADB driver.
Have you installed the driver? Restart your computer!
2. Make sure that the device is in bootloader mode, otherwise fastboot will not see your Android!
3. Use an original and undamaged microUSB cable! Everything should be clear here, if the cable is damaged, hence the visibility problem, perhaps you can transfer or receive files from this cable, but you won’t be able to work with Fastboot! Also, do not use a damaged USB port on your computer!
4.Use only USB 2.0 port! Despite the fact that the USB 3.0 standard has already existed for several years, it is still too early to talk about large-scale implementation. Fastboot working with USB 3.0, although possible, is still not desirable!
5. Do not use USB hubs! Never, under any circumstances, use USB hubs; working with Fastbot becomes like luck - you'll be lucky or unlucky.
7. Try connecting Android to a different USB port.
9. Open the command line as “administrator”.
If you once had a similar problem “waiting for device” and solved it in your own way, not from the methods listed, then do not hesitate to write in the comments!
That's it! Read more articles and instructions in the section. Stay with the site, it will be even more interesting!


