How to call up the Windows 8 boot menu. Restoring the bootloader using Microsoft tools. Using the graphic menu
When installing an operating system, you need to go to the Boot Menu to tell your computer which device to boot from. This is also necessary when you need to run from a Live CD or bootable flash drive. Today I will tell and show you how to enter Boot Menu both on PC motherboards and laptops.
Just like you need to press a special key (F2 or Del) to enter the BIOS or UEFI, there is also a specific button to bring up the boot menu. As a rule, these are the F11, F12 or Esc keys, but there are exceptions. Usually, when you turn on the computer, under the splash screen you can see a key that is responsible for calling the Boot Menu.

You can, of course, do without the Boot Menu by simply selecting a certain order for loading devices in the BIOS, but if you want to boot one-time (checking for viruses or installing a system), then I would advise using the boot menu, because it is much faster.
So, why do you need the Boot Menu at all - you ask. This menu shows a list of devices connected to the PC from which you can boot (flash drives, CDs, hard drives) for further installation systems or for testing components.
Logging into the Boot Menu in Windows 8 and Windows 10
If you are the proud owner of a laptop on which Windows 8, 8.1 or Windows 10 was originally installed, then you may not be able to enter the Boot Menu. I’ll explain why: shutdown in these systems is not complete, since it is more like hibernation, so when you press F11, F12, Esc, the boot menu may not open. There are several ways to fix this:- hold down the Shift button when selecting “Shutdown” and then the PC should turn off completely;
- disabling quick system startup - in G8, go to the Control Panel,

Go to "Power Supplies"

On the left click on "Actions" power buttons",

Disable the “Enable” item quick start"(you can do this not even on a laptop).
Logging into the Boot Menu on Asus laptops and motherboards
Almost all landlines Asus computers To enter the boot menu you need to press the F8 button immediately when the computer turns on. If we press F9 or Del, we will get to the BIOS.
Regarding laptops, it's a little confusing. The Esc key opens the boot menu on modern models; on older laptops, the F8 key works, and mainly on models whose names begin with the letter k or x. In short, if the Esc key does not bring up the Boot Menu, then we reboot and try pressing F8.
Logging into the Boot Menu on Lenovo laptops
To call up the boot menu on Lenovo laptops Just press the F12 key. If you want to use additional boot options, press the additional arrow key,
Logging into the Boot Menu on Acer laptops
On all Acer laptops and all-in-one PCs, the Boot Menu can be accessed using the F12 key when turned on. But laptops from this company have one unpleasant feature - the ability to call the boot menu is disabled in the BIOS settings. To fix this, let's get into the BIOS by pressing the F2 key. Now let's find the "F12 Boot Menu" parameter and activate it so that the word Enabled appears next to it. All that remains is to save the settings and exit the BIOS.
Below in the table you can see all other laptops and the key to call the Boot Menu and BIOS:

I hope the information in this manual was useful to you. If you have any difficulties getting into the boot menu, write in the comments, I’ll try to help!
Safe Mode ( Safe Mode) - a special mode of operation of the operating system in which it boots minimum set drivers and system services required to start the system. It is intended mainly for diagnostics and troubleshooting. Safe Mode appeared in Windows 95 and has been present in all systems since then, without exception. operating systems ah Microsoft.
In Windows 8, developers added new boot menu in Metro style. As a result, it will no longer be possible to get into safe mode in the usual way by calling up the boot menu using F8. This doesn't mean that Windows 8 can't be booted into safe mode, it's just done a little differently than before.
Using the graphic menu
If you need to boot the system into Safe Mode once, you can use the new boot menu. To do this, press the key combination when loading Shift + F8 and in the window that opens, click and select “Advanced recovery options.”
Then select “Diagnostics”.

Then "Advanced options".

And finally, select “Reboot Options”

And click the “Restart” button.

After the reboot we will finally reach a menu in which, using function keys F1-F9 you can select the required boot mode. It takes quite a long time, but it will do for one time.

Changing the current boot mode
If you need to boot into safe mode more than once, it will be more convenient to change the current OS boot mode. To do this, press the key combination Win+R, enter the command msconfig and click OK. The system configuration window will open, in which we are interested in the “Download” tab. Here you need to check the “Safe Mode” checkbox and select one of the options:
Minimum - standard safe mode;
Another shell - support command line;
Recovery Active Directory— loading in directory service recovery mode, only possible on a domain controller;
Network—network-enabled mode.

Next, apply the selected parameters, close the system configuration window and agree to reboot. Now the system will always boot into safe mode. To boot in normal mode, you will need to go into the system configuration again and uncheck the “Safe Mode” item.

Creating a new boot entry
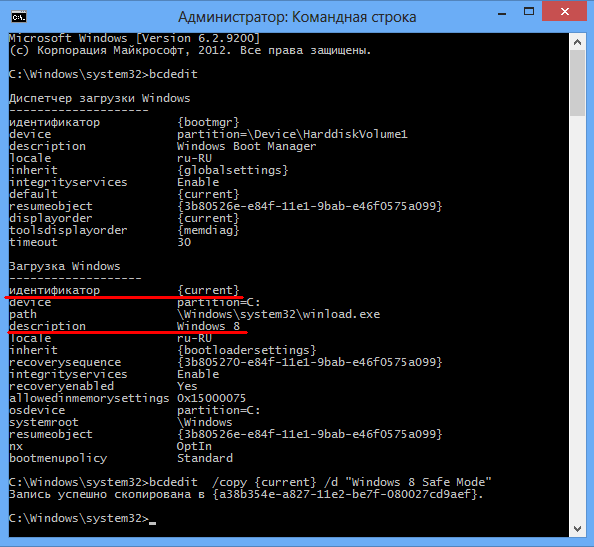
The previous method can be slightly modified. Instead of changing the current boot mode, you can add a new item to the boot menu. To do this you will have to use a command line utility. So, launch the command console with administrator rights and enter the command bcdedit, which will display current configuration downloads. We find the identifier of the current boot record, as a rule it has the value current. Let's copy it and name it "Windows 8 Safe Mode" :
Bcdedit /copy (current) /d ″Windows 8 Safe Mode″
Then we go to the system configuration, select the created entry, and enable booting in safe mode for it. You can also change the boot option selection timeout and make these settings permanent.

When saving the configuration, you will receive a threatening warning that the changes will become permanent and cannot be undone. Don’t be alarmed; to delete a boot entry, just select it and click the “Delete” button. Therefore, feel free to agree to apply the changes made.

Now all that remains is to restart the computer and we will see a new menu. By selecting Windows 8 Safe Mode, we will start the system in safe mode.

Return to the classic menu
If all of the above methods do not suit you, then you can completely abandon the graphical boot menu and return to the classic version that was in Windows 7. For this, there is a special parameter in the boot entry configuration bootmenupolicy, which can have one of two meanings:
Standard — Windows boot loader 8 s graphical interface(used by default);
Legacy- classic bootloader.
To change this setting, open the command console with administrator rights and enter the command:
bcdedit /set (default) bootmenupolicy legacy
You can see what happened with the command:
bcdedit /enum (current)

Then we reboot the machine, press F8 and there it is, the familiar boot menu.

Well, no matter what option you use, as a result you should see this picture on the screen.

Can't boot Windows 8 or Windows 8.1 in Safe Mode? Are you pressing F8 or Shift+F8 but it doesn't do anything? Loading the new operating system from Microsoft has become so fast that it is not always possible to interrupt it with keystrokes.
You can login securely Windows mode 8 or 8.1 5 in different ways, any of them will allow you to run the system on Windows 8-8.1 safely!
Safe Mode in Windows 8 and Windows 8.1 is practically no different from that in more earlier versions OS.
The operating system still loads only the most basic drivers and services. The only noticeable difference is that the minimum screen resolution in Safe Mode has increased from 800x600 pixels to 1024x768 pixels.
1. Use the System Configuration tool (Msconfig.exe)
As with , the easiest way to boot into Safe Mode is to use the System Configuration program, also known as msconfig.exe.
Launch it, go to the “Boot” tab and in the boot options activate the “Safe Mode” option. Then click on the "OK" button.
Next, you will see a message stating that you need to restart your computer. Click Restart or Quit Without Reboot, depending on whether you want the computer to restart now or later.

Next time Windows startup 8 (Windows 8.1) will boot into Safe Mode.
2. Use the combination Shift + Restart
Click the power button on the Windows login screen or in the Settings Charm. Then press and hold the SHIFT button on your keyboard and click Restart.

Windows will prompt you to select an option. Select "Diagnostics".

On the Diagnostics screen, click the Advanced Options button.

On the screen with additional options Click Boot Options.


When your computer restarts, a list of 9 options will appear on the screen, including three types of Safe Mode.

Press F4 on your keyboard to enable Safe Mode, F5 to enable Safe Mode with support network drivers and F6 to enable safe mode with command line support. After this, Windows 8/Windows 8.1 will be downloaded according to your selection.
3. Boot into safe mode using CD/DVD to restore system (Windows 8 only)

On Windows 8, but not Windows 8.1, you can . So, if you have such a disk, you can boot from it.
After booting from the recovery disk, you will be prompted to select a keyboard layout. Select the one you want to use. You will then see the options screen. All further steps will be identical to those described in method 2.
4. Boot into USB Safe Mode to Restore System

Windows 8 and Windows 8.1 allow . Detailed instructions can be found at the link. Using such a disk you can also boot the OS in safe mode. To do this, boot from your System Recovery USB drive and follow the instructions from the previous method.
5. Use F8 or Shift + F8 (does not work when using UEFI BIOS and SSD)
In the case of Windows 7, just press F8 just before starting the operating system to get to a menu with additional boot options, from where you can boot the operating system in safe mode.

For Windows 8 and 8.1, some sites advise using the keyboard shortcut Shift + F8, which launches recovery mode, allowing you to boot into safe mode. However, the problem is that neither Shift + F8 nor just F8 often work.
In a post on its official blog, Microsoft explains that this behavior is due to the very fast boot process. Steve Sinofsky once said: “Windows 8 has a problem. It loads too quickly, so quickly that you actually don't have time to interrupt it when you turn on your PC. The operating system simply does not have time to detect pressing the F2 or F8 keys.”
In general, if you have modern computer With UEFI BIOS and SSD, you are unlikely to be able to interrupt the boot process with keystrokes. On older PCs with a classic BIOS and no SSD, pressing these keys still works.
Have a great day!
Boot Menu is a menu that allows you to select the device that the system will process first. This function is actively used to replace operating systems and to carry out diagnostics, such as RAM with MemTest.
This function is extremely convenient, as it is intended for a one-time launch of the equipment as the main carrier. This same function is needed when Windows installation, since it does not require a change in priorities.

After completing the steps required to enter the menu, all devices that are currently connected to the computer and with which the program is potentially likely to be launched will be displayed.
Unfortunately, there is no single denominator in the issue of entering the described menu, since there is no strict standard in this industry yet. However, there is a dependence of the manufacturer and the actions required to launch the Boot Menu, which will be discussed in detail in the article.
General information on entering the Boot Menu
Boot Menu is used to specify which device the program should be launched from. Of course, the BIOS already has such functionality, but for one-time use, for example a program, it is better to use the boot menu.
An interesting question is how to call up the boot menu on the motherboard because there are no standards in this regard. Each manufacturer uses different options. Most often, a hint appears on how to go to the section. In general, the F8, F9, F11, F12 and Esc buttons are used.
To launch the desired menu, press the key corresponding to your brand of motherboard during system startup. Often several of the above buttons are used. You can get more accurate information by going to the section that corresponds to your computer manufacturer.

There are also slight differences in launching the necessary menu in all-in-one PCs and laptops that have pre-installed Windows 8 and above.
How to access the boot menu on a netbook? – The situation is complicated by the fact that laptop computers may not use a full shutdown, but instead use hibernation. This option is quite justified, as it returns the PC to a working state faster, but is not suitable for entering the menu. You only need to completely turn off the netbook by holding Shift and clicking on “Shutdown”. If this does not help, then you need to configure the “Power Options” section.
Launching Boot Menu in Windows 8, 8.1, 10
The whole point is that personal computers In this configuration, hibernation mode is most often used instead of the usual shutdown. Often this has a positive effect on the system boot time, and processes launched in the previous work session are restored, but in this case this method is not suitable for us, to do this, use one of the following options:
1.Restart the computer using the appropriate option in the menu, you don’t need to just turn it off with the button and turn it on again, for the reason just described;
2. At the moment when you press the “Power off” button, hold Shift key, thanks to this procedure, the PC will shut down completely, then press the desired key at the time of startup;
3.You may need to disable Fast Startup.
- Open the Start menu;
- Go to “Control Panel”;
- Select the tile named "Power";

- Follow the link “Actions of the power buttons”;

- Disable the "Quick Launch" item.
After completing these steps, when the system starts, you will need to press the required key, usually Esc, F8, F9, F11, F12. More detailed information according to your motherboard model is indicated below in the appropriate paragraph.
Login to Boot Menu for Acer manufacturer
This manufacturer uses the same key to enter the Boot Menu on all versions of computers, all-in-one computers and laptops, this button is F12. Distinctive feature is only an item in the BIOS or UEFI that includes the necessary handler, that is, nothing will happen until you enable this function, sometimes it works by default, for this:
1.Go to BIOS, for this boot press F2 or Del;
2.Find the “F12 Boot Menu” item;
3.You need to replace the value with “Enabled”;

4.Restart your computer.
After completing these steps, the boot menu should become available by pressing F12.
Boot Menu for Asus
For the vast majority of computers on which this platform is located, you need to press F8 to launch the Boot Menu, but with laptops everything is a little more complicated, there is some division here.
For most Asus laptops, the Esc button is used, but this is more likely for more or less modern PCs, and for models that start with K and most with X, F8 can be used.
Logging into the Boot Menu on Lenovo laptops
It’s quite easy to go to the menu of interest thanks to the F12 key, it is used in all models. This situation also applies to monoblocks from the same manufacturer. A distinctive feature is a special button located on the case, next to the standard switch, usually a circular arrow is drawn on it; by clicking on it, you can get to the menu of special system startup options.

Information on other manufacturers
For most manufacturers, there is no point in describing instructions for going to the Boot Menu, since the only difference is the required key, and everything else works according to the standard scheme, so:
- Laptops Dell, Toshiba and motherboards Gigabyte boards– F12;
- Samsung laptops and motherboards Intel boards– Esc;
- HP laptops – F9;
- AsRock and Maternal MSI boards– F

This should be enough to launch the Boot Menu for any computer configuration; if you have a little-known manufacturer, you should use the instructions, which should be presented on the manufacturer’s website.
If you still have questions on the topic “How to enter the Boot Menu on a laptop and computer?”, you can ask them in the comments
if(function_exists("the_ratings")) ( the_ratings(); ) ?>
Disclaimer: this article was published on our website two years ago. However, the methods described in it then partially stopped working. On at the moment The article has been updated and relevant, everything written below has been tested on Windows 8.1 Updated.
I'll tell you about three ways How to boot into safe mode:
- Using the system shutdown menu - works when the system boots at least to the user selection screen;
- Through the msconfig utility - it works only if it is possible to run it;
- Using a system recovery disk is a more labor-intensive method and will help those who have a G8 that does not boot.
1. Boot into safe mode by shutting down the system
This is the easiest and fastest option. It works regardless of whether the user is logged in account or not. Hover your mouse over the system shutdown menu, and while holding the Shift key, select “Reboot.”
After a short wait, the system recovery menu will open. An alternative way to launch this menu is to type the following command on the command line:
Here we are interested in the “Diagnostics” section. We go along the path “Diagnostics” - “Advanced options” - “Boot options”.

At the exit, we will be greeted by a boot options window with a detailed description of what we will get after restarting Windows.
Click “Restart” and select the key corresponding to the desired one from the proposed parameters:
- F4 - to start safe mode;
- F5 - to start safe mode with loading network drivers;
- F6 - similar, only with command line support.

As a result, Windows 8.1 will boot into safe mode.

To return to normal mode Windows operation, just reboot the system.
2. Entering safe mode through the system configuration utility
You can get into safe mode in another way, which requires logging into your account. Windows entry 8. To launch configuration settings, open search, enter and run the utility.

Switch to the “Boot” tab and check the box next to Safe Mode.

You can also select the type of safe mode:
- Minimal is normal safe mode;
- The other shell is safe mode with command line support;
- Network is a safe mode that loads network drivers.
After selecting the desired download option, click Ok and restart your computer. As a result, it will automatically boot into Safe Mode.
If you restart your computer again, it will go into safe mode again, and it will stay that way forever. To return to normal system boot, open msconfig and uncheck the box, click Ok, and reboot the system.

3. Using a recovery disk
The two methods shown above allow you to start safe mode while the system is running. But what to do if Windows 8 does not load at all and the Shift+F8 key combination does not work? In this case, you will need a recovery disk, which you, as a prepared user, created in advance. No? Then you need to create it and act according to the scheme described below.
Disk is being created Windows recovery 8 is very simple - the standard package of the 8 includes a creation utility. We launch it and act as directed by the program, everything is very simple and intuitive (the process of creating a bootable flash drive can be seen in the video at the end of the article). The only requirement for the disk/flash drive is that the media must hold at least 256 MB of data.

So you have a recovery disk. You need to boot from it and select one of the proposed keyboard layouts. After this, follow the path “Diagnostics” - “Advanced options” - “Command line” (you will not see a direct link to boot the system in safe mode).

Select the command line and enter:
bcdedit /set (globalsettings) advancedoptions true
After receiving a message about a successful operation, close the command line and select “Continue”.

The long-awaited menu appears before us.

We select what we need and load.
There is one point: after the steps described above, Windows 8 will always offer this menu when booting. To return to normal boot mode, enter the following command on the command line:
bcdedit /deletevalue (globalsettings) advancedoptions
We looked at three ways to launch the command line under Windows 8.1. I hope that they will help you bring a crashed system back to life or troubleshoot problems that have arisen.
Finally, a video that shows everything that is written in this article, only more briefly.
Subscribe to our channel on Youtube. See you!


