How to remove an old version of Windows xp. How to remove an operating system if there are two of them, editing the windows boot menu. Removing via Disk Cleanup
If you need to make complete removal Windows 7 from a laptop or desktop computer to clear the hard drive memory from the old “Seven”, then if you have detailed and step-by-step guides This will not be difficult to do even for beginners. Below are instructions on how to properly remove operating system Windows 7 from a computer and at the same time leave the files the user needs intact, or, if the PC has two working OSes, then do not harm the functionality of the other.
Preliminary activities
Before you completely remove Windows 7 from your computer, you should save necessary files With system partition, on which the OS to be deleted is installed in memory external media, V network folder or on a logical volume hard drive PC, for example, on drive “D”.
 It is recommended that in addition to files from the “My Documents”, “Music”, “Videos”, etc. directories, you also save the contents of your desktop.
How to remove Windows 7 from a computer when it is the only OS?
Let us remind you that it is very important to first copy all the necessary information from the system partition. User information is stored in the "Users" directory in the root directory "C".
 You need to transfer the necessary files from this folder to a device with the appropriate amount of memory.

While Windows 7 is running, you cannot uninstall its content folders, so you need to boot your PC from bootable external media. After starting your computer or laptop, you will need to open the “Disk Management” menu and format the partition on which Windows 7 is installed.
The formatted disk will be completely clean from the old system.
 There is another method of uninstalling all directories and files of the “Seven” - this is using installation disk with the distribution kit of any OS, format the “C” drive.
Uninstalling old Windows 7
If the new OS is installed on a disk with the old system, i.e. no formatting was performed during installation, then a directory called “Windows.old” appears. It stores folders and files of the old “Seven”.
 The following sequential steps must be performed:

If several operating systems are installed on your PC at the same time
To uninstall Windows 7 from a multi-system computer, you only need to perform a few steps:
- Formatt the disk on which Windows 7 is installed, following the algorithm of actions indicated in the very first part of this instruction;
- After this, you need to remove it from the OS startup list.
Even if you format a disk with Windows 7, this operating system will remain in the boot list.
 To exclude it from this list, you need to take the following steps:

Should “Seven” be deleted?
If some elements of the system are not suitable for the user, then it is more advisable to configure the Windows 7 settings to meet the user’s specific requirements rather than removing the OS from the PC. To date, there is no more optimal operating system from Microsoft yet.
Reliable and convenient XP has already completely lost support, “Eight” mainly causes negative reviews from users all over the world, and the brand new Windows 10 is still crude and still has many shortcomings. It is recommended to periodically optimize Windows 7 and customize it for yourself.
Conclusion
But in the case when the owner of a computer or laptop nevertheless decided and uninstalled Windows 7, and then changed his mind some time after working on another system, then “Seven” can always be installed again.

Good afternoon, friends. I think every user has noticed that after he installed a new operating system, this OS begins to work like a well-oiled clock. Everything loads quickly and correctly. It's a pleasure to work with such a system.
But time goes by, and the system begins to slow down. There is a long loading time when turned on, and the system also takes a very long time to turn off. The same thing happens with programs installed on this system. They take a long time to load and do not work correctly.
Of course, the most best way, clean the system. I have written more than once about cleaning the system in my articles. I even wrote two free books about this: - “ How to speed up your computer? And " How to properly clean Windows?».
But let's say the user has already decided to delete this system and install a new one. Although, we delete systems not only because of failures. Quite often this happens when a new OS is released. When the user simply wanted to install a new system. In both of these cases, the old system will have to be removed.
Also, a system is often removed when there is another parallel one, and the second one becomes simply unnecessary for us. So how to do it right? Today we will look at three ways to completely remove Windows 7 from your computer, although this applies not only to Windows 7, but also to other operating systems.
How to remove Windows 7 from your computer - replace it with a new system
We will do this by using the installation disk, which we will load from the BIOS. To do this, during system boot, select BIOS settings. So, boot disk in your disk drive. As soon as you click to turn on the computer, immediately press F2. Moreover, you need to do this before loading the Microsoft logo.
You will enter the BIOS settings, from where you can select the boot order of the disks on your PC. We enter the Boot section.


To do this, click on CDROM and set the priority.


Then press F10 to save the settings. Now we can remove our system by installing another operating system on it, the one you decided to install. At the same time, you can remove the system from the BIOS using other things third party software, for example, Acronis Disk Director, but we will still consider removing it by installing a new one on the old system.
This is the most common and convenient method. I will not talk about all the nuances of installing the system, especially since I already have an article on the topic of installing the system. I’ll just explain that if you already have a system installed and you decide to install another one on it, then during the installation of the system, before choosing the partition where you will install the new system, the old one must be formatted.
To do this, being in the window for selecting a disk for installing the system, you need to click on the line at the bottom of the “Disk Settings” window.


Then, we will have a warning about deleting all information from this section. Which is exactly what we need.
Our disk has been formatted. Then, all you have to do is continue installing the new operating system.
To speed up your Windows installation, I recommend:- Computer accelerator.
How to remove a second Windows from a computer First method
Many users have two systems. We will consider the case when both of them are located on the Hard Drive, but in different partitions (often people put the second system on virtual disk in the same section).
So, to do this, click on the “Computer” shortcut right click and select properties. A window will open with our disk partitions. Select "Advanced options" in the left column.


The “System Properties” window appears. In the “Advanced” menu, select “Options” above the “Boot and Recovery” line.

Then the most important thing begins. In the window that opens, you need to select the system that you want to leave, from which the download will occur. If you make a mistake, the system simply won't boot.


Click OK. Also, this method suitable if you just want to remove the second Windows from the boot menu.
We need this action to eliminate surprises. For example, if the default boot is the system that you want to remove, and you do not change the system, the computer will simply not start working.
Now, close all open windows, click on the “Computer” shortcut with the left mouse button. In the window that opens, select the disk on which the parallel system, which we wish to delete. In my case, this is drive D. To do this, right-click on the drive and select “Format”.

In the window that opens, select “Start”. We get a warning about the consequences of formatting. Click OK and the disk with our second system is completely formatted.


How to remove parallel Windows from your computer Second method
This method is much simpler. For this it is enough command line enter “System Configuration” or msconfig and open the program. Select the “Download” menu. In the window that opens, we will have information about our operating systems. Since my system is on at the moment one, then the program shows one system.


Then, select the system that needs to be removed and delete it by clicking on the “Delete” button.
After completing the procedures, it is advisable to clean the registry. The task is completed, the second system is deleted!
You now know how to completely remove Windows 7 from your computer and you shouldn’t have any problems with this. Also, I’m interested in your opinion on this issue in the comments! Good luck!
Friends, after removing Windows from your computer, I suggest you install it on something other than a regular one. HDD drive, and on solid state SSD drive like I did. Disks on a page range from 120 to 960 GB, i.e., actually 1 TB. You can purchase it from the link... on AliExpress. Judging by the description, the disk is suitable for both Computers and (laptops).

From the screenshot you can see the disk volumes. If you need to install the system, it is enough to purchase a disk with a capacity of 120 GB. If it’s like a full-fledged hard drive, then, at your discretion, from 480 to 960 GB. Why do I recommend installing Windows on a solid-state hard drive? Your system will boot in seconds! If you purchase a 1TB disk, all your programs will work!
Sometimes users install new Windows 7, but forget to delete the old one. There is nothing critical about this, but old Windows takes up a lot of space. This article contains information on how to remove old Windows 7.
There are several ways to remove old Windows:
1. Removing old Windows using Disk Cleanup
You need to run Disk Cleanup. You can find it through "Start". Click “All Programs”, then “Accessories”, then “Utilities” and find the required component in the list.

It is the item "Previous Windows installations"This is what we need. Select the checkbox if it is not there and click OK. When asked about irreversible deletion, answer “Delete files.” After some time, the files of the old Windows 7 will be deleted.
2. Removing old Windows without programs
If for some reason the program cannot be found or there are problems with it, you can remove it from Windows manually. To do this, find the folder Windows.old and set the rights necessary for deletion.
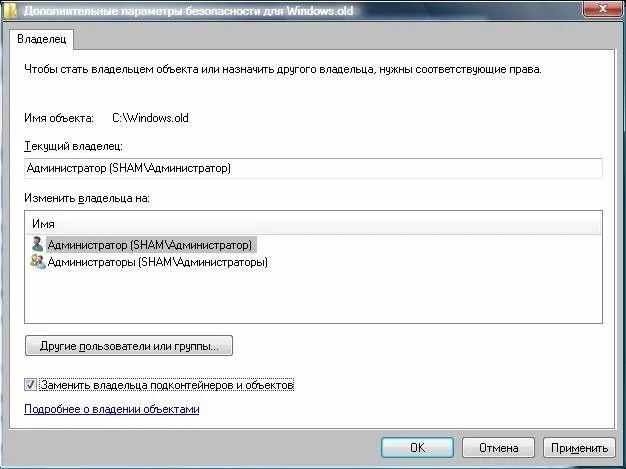
Go to the folder properties (RMB - Properties) and go to the "Security" tab

Click on "Advanced". On the "Owner" tab, select current user and check the box “Replace owner of subcontainers and objects” and click “Apply”.
Now on the “Permissions” tab, select the account that you made the owner of the folder and change it (the “Change” button)

A window appears with Permission element, where we put a check mark where highlighted in the screenshot below. Then click OK and with a safety warning.

After the manipulations have been done, it will be possible to delete the Windows.old folder without difficulty and the question of how to remove old Windows 7 is resolved.
3. Removing old Windows by formatting the disk
This method is more drastic, but as they say, “fail-safe.” The bottom line is that you need to boot from the installation disk or flash drive and start installing clean Windows. At the time of selecting a disk, you will need to delete all partitions, partition the hard drive again and format all partitions. This way we get a clean system, without any signs of old operating systems.
Attention! This method will delete all data that is on the computer, so it is recommended if you don’t mind it.
Which can take up several gigabytes of disk space. Moreover, in the boot menu previous versions Windows continues to hang, prompting the user to boot from it. In addition, they clog the PC hard drive and slow down its operation. So, how to remove old Windows?
Via the disk cleanup menu
Put away old version windows can be done through the Disk Cleanup utility, which is available in all Microsoft operating systems, including Windows 10
Go to “Computer” and right-click on the icon of the section where the previous version was. Select “Properties”, then “Disk Cleanup”.
The system will begin scanning this partition for trash files; Among them will be the item “Previous Windows installations”
Make sure it is ticked.
Confirm deletion. Windows yet Once it asks if you want to continue the operation, click “OK”. After a few minutes, the utility will notify you that all trash files have been deleted.
The Disk Cleanup utility can be called in another way: left-click the “Start” manipulator and enter the word “Cleanup” in the search bar (works also for Windows 10/Windows 8.1). In the list that appears, select Disk Cleanup. Click the “Enter” button. The utility will prompt you to select the partition where the cleaning operation will be performed.

The previous version of Windows can be detected and removed using other cleaning programs. You can use, for example, CCleaner, latest version which was optimized for working with Windows 10. You can install other utilities - Glary Utilities, IOBit Advanced Care and so on. The main thing is that they support working with windows 10/8.1/7.
Removing the “windows.old” folder and adjusting the boot menu
It happens that neither a standard Windows cleaner nor a third-party one can find old files. This leads to the fact that the user has to look for the “windows.old” folder himself, delete it, and then, through the Windows boot configuration menu, disable the function of selecting a version that no longer exists. But for this you need to install system administrator rights
How to do this? It’s very simple: press the Win+R key combination, enter secpol.msc and click “Enter”. In the left menu that appears, double-click on “ Local policies", then - "Security Settings". After that, now in the right window, look for the item “Accounts: State “Administrator”. Double-click on it and switch from “Disabled” to “Enabled” and save the changes.
After this, you need to reboot and launch the new (not old!) version of the operating system. After the main boot stage, Windows will prompt you to log in through two accounts, including the administrator. We go through it. That's it, now you can play around with the system as a system administrator.
Now you need to use Explorer to go to the section where the “windows.old” folder is located and delete it. To do this, right-click on the icon of this folder and select “Properties”. Then you need to click on “Security” and then on “Advanced”. Among the proposed tabs, select “Owner”, click the “Change” button and select the one account, from which the removal will be carried out. Save the changes with the “Apply” button and click “OK”.
A message will appear indicating that we have become the owner of this directory. Click "OK". Now you can delete the “windows.old” folder (after moving it further to the “Trash”, this directory must be removed from there too).
Now you need to go to the boot configuration menu. Press the Win+R key combination, enter msconfig and click “Enter”. Go to the “Download” tab and select previous ones Windows versions. Click the “Delete” button

The computer will prompt you to restart. We agree and restart the system. That’s it, the question “how to remove old Windows” is resolved.
Operating Windows systems Although they are incredibly popular, they still cannot boast of long-term stable operation. So, in some cases, the need to reinstall occurs several times a month - it all depends on the programs the user is working with.
In light of this, it is not surprising that many are interested in the question of how to remove old Windows. The point is that the installation new system over the existing old one is highly not recommended, as this rarely allows you to eliminate software errors and failures, rather, add new ones. Starting with the Vista operating system, Microsoft developers took into account the wishes of users and added them to the installer special opportunity, thanks to which it has become much easier to figure out how to remove old Windows.
Advanced installation mechanism
Before we tell you how to remove old Windows, let's analyze the behavior of the installer on Win XP systems (and more earlier versions), as well as Vista (and later).

When installing older systems on hard section disk where a copy of the system was already present, the installer prompted the user to make a choice - erase existing folder Windows or start installation in a directory with a non-standard name. In both the first and second cases, all data from the “Documents” section, “Desktop” and other key folders were lost. I had to learn how to remove the old Windows while keeping the files I needed. With the advent of Vista, the situation changed: the installer, having discovered a copy of the system, renamed it to Windows.Old and moved all related folders there. The significance of this small innovation for end users cannot be overestimated - it is revolutionary.
How to remove the old oneWindows 7
Depending on the system being installed, the preparation also changes. Let's consider a more complex option, when Win XP is installed on the hard drive. The easiest way to save any files from previous system- this is to prepare media with a bootable version of LiveCD.

There are quite a lot of these solutions, so there shouldn’t be any problems with choosing. You should download a LiveCD from the Internet. According to the instructions provided with it, write it to a disk/flash drive. Then boot into this mini-system and copy the necessary data. The next step is to delete the Windows, Program Files folders. If we are talking about Win 7, then you can also erase ProgramData, Users. All that remains is to reboot and start the installation. In case it is installed new version system, then a LiveCD will not be needed: after installation is complete, there will be a Windows.Old directory on the disk, where all system data will be transferred. What you need from here must be copied, and what is unnecessary must be erased. Removing remnants of the previous system can be done through the “Disk Cleanup” function in the “Start” - “Accessories” - “System Tools” menu, indicating “Previous installations” in the list. Sometimes people who want to use the system for free are wondering how to remove the old Windows activator 7. To do this you need to restart this program and select the uninstall option. Another method that is no less effective is to install a new solution simply on top of the old one. All key links will be automatically overwritten.


